I’ve dreamed of having servers in my home to do various things and, I guess, it’s finally taken on a life of it’s own!
See, it started with me implementing Pi-Hole, to stop annoying advertisements from websites. Of course, I have a bunch of IoT devices and have controllers.
Then Raspberry Pi announced the 8Gb Raspberry Pi 4. I bought one as soon as I could and wondered, what should I do with it? I’ve always wanted to install Home Assistant should our network connection ever go down, we can control our devices.
I added a Synology NAS as I needed the space and the redundancy for backups and the Raspberry Pi Retroconsole project I’ve been curating. This also allows me to run Docker containers – the ability to run a particular piece of software in it’s own little – are pretty cool.
The thing with Home Assistant, you don’t want to run that off an SDCard as it will burn it out. So I bought an Argon One M.2 case with a 250 Gb SSD. A Raspberry Pi running off an SDD is pretty quick! It surprised me.
So, Home Assistant doesn’t use that much space, so I’m wasting the space on a 250 Gb SDD! Also, admittedly, the fan on the Argon One M.2 case started making noises and I had situation where I thought I lost the SDD, so I decided to switch the case to a SunFounder Pironman – I’m all about the LED lighting.
So far so good.
So with that done, I’m deciding to experiment with a bunch of services hosted on both the NAS and my Pi 4 8Gb:
Pi-Hole – I’ve already mentioned, this is my Ad Blocker
Home Assistant – i’ve mentioned this too, which allows me to run my IoT devices independent of their cloud brokers
Mealie – This is a new addition, a recipe manager that will scrape website pages for recipes. I really like this concept, and have been somewhat fascinated by recipe managers since my Timex Sinclair 1000 days
WordPress – This was the first iteration of a dashboard, more a page of links to servers and such inside our home. I’m not sure I’ll use this much, but having the option, I might be inspired to put it to use
Homarr – is everything I ever wanted in a Dashboard for a home. It’s easy to add new buttons for internal web services and more! The perfect starting point!
OwnCloud – With the space on the Raspberry Pi, I could put some important files on here as a just in case backup fron the NAS and cloud; accessible anywhere.
Kasm – I heard about this from a YouTube video on servers people are running at home. I’m completely blown away that my Raspberry Pi 4 with 8Gb can run two streaming Docker containers running a game of Doom and a full Debian Linux instance! It’s pretty awesome and gives me a bunchmark for just how powerful a Raspberry Pi is.
Plex – I run Plex off my Mac server for streaming videos
Apple Music – Last but not least, my music streams off my Mac server
I also have dedicated systems that run a web browser, PHP and control LEDs for saying a room is busy.
I figured I’d document setting up an uninterruptible power supply (UPS) with a Synology NAS that can also shutdown a Mac and two Raspberry Pis that drive certain aspects of my home network.
I am using NUT as clients on the Raspberry Pi and macOS computers that connects to my Synology NAS with an APC UPS connected.
Put in the IP addresses of the computers you want to send shutdown messages to. While it says, “Permitted Synology NAS Devices”, you can use Network UPS Tools (NUT) clients in both macOS and Raspberry Pi OS to monitor
You do need to give those clientsand your NAS static IP addresses, which they have on my network
Raspberry Pi Setup
Setting up the client on Raspberry Pi is pretty straight forward. The link provided covers setting up as both server and client if you ever wanted to use a Raspberry Pi as a server.
For the purposes of my setup, I’m going to recommend letting the NAS be the server in this case.
I adore the Raspberry Pi platform. A small, credit card-sized computer, that’s cheap, relatively powerful and extremely versatile. If you’re looking for one, have a look at rpilocator.com which provides inventory detail around the world for Raspberry Pis.
While they primarily run Linux, there are a number of operating systems available including a bunch of Linux distributions including sub variants like Android and ChromiumOS, FreeBSD, RISC OS, and Plan 9.
I pretty much run Raspberry Pi OS, formerly Raspbian, on all my Pis. Here are a few projects I’ve created over the years
OctoPrint – I run OctoPrint on my 3D printer as a print spooler so I can keep my other computers going on other projects, especially for long print jobs.
Pi-Hole – I run an ad blocker on my home network so it a) reduces the amount of traffic on my home network, b) reduces how often we get profiled by ads, c) reduces annoying web pages as much as possible.
RetroPie – I run RetroPie on my home arcade consoles with my curated image of games from the 70s to early 2000s.
Recalbox – I have a few handheld Raspberry Pi Zero -based gaming machines such as the Retroflag GPi Case that run Recalbox. Well worth looking into as an alternative to RetroPie.
Pi1541 – When backing up old Commodore 64 disks and adding to my curated game images, I sought out Pi1541 to save backups of my disks. It works very well as a 1541 drive emulator.
Pimiga – Anyone who knows me knows how much I love Commodore Amiga computers, and I have quite a collection at home. When I heard about Pimiga, I had to try it out. It’s pretty amazing.
PiStorm – While i’ve not actually finished setting this up, I have a PiStorm to breathe new life into my Amiga 500 and 1000 in my collection. In short, it replaces the Motorola 68000 with software emulation running on the Raspberry Pi, accelerating the Amiga, and also supports RTG so you can run your Amiga off an HDMI screen rather than having to find a 15khz monitor. it also allows you to run any Kickstart – available with Coloanto Amiga Forever.
Home Assistant – I attempted to setup a Home Assistant at home, however I think I unfortunately killed the SSD – I’m in the process of reviving it – despite having a fan in the case. I went with Home Assistant as I’ve been concerned – what happens to our web-connected smart devices when manufacturers fold or cease to support a device? I’m using an Argon One M.2 case for this project.
Home brew projects
On Air Indicator – Based on a Raspberry Pi Zero W, I created an internal website that indicates if a room is in use, okay to enter, etc. Useful for Scott’s office when he’s teaching. I used a Pimoroni Blanket! LED, Apache, PHP and Python to
Game Console – An extension of RetroPie, here is a link to my page for how I put together my custom arcade game console.
What models am I using?
Primary Pi 4s and 400s with 4Gb of memory. I use a Pi 400 as my “primary” Linux machine in my office for general tinkering, testing and other geekery at home.
My OctoPi runs off a Pi 3B, and it’s more than enough power for that setup.
My handheld and On Air Indicator project run of Pi Zero Ws, and I have a Pi Zero 2W I also use with the GPI case – the 2W is close in power to a 3 which is huge.
For PiStorm, I’m using a Pi 3A which has a much thinner form factor.
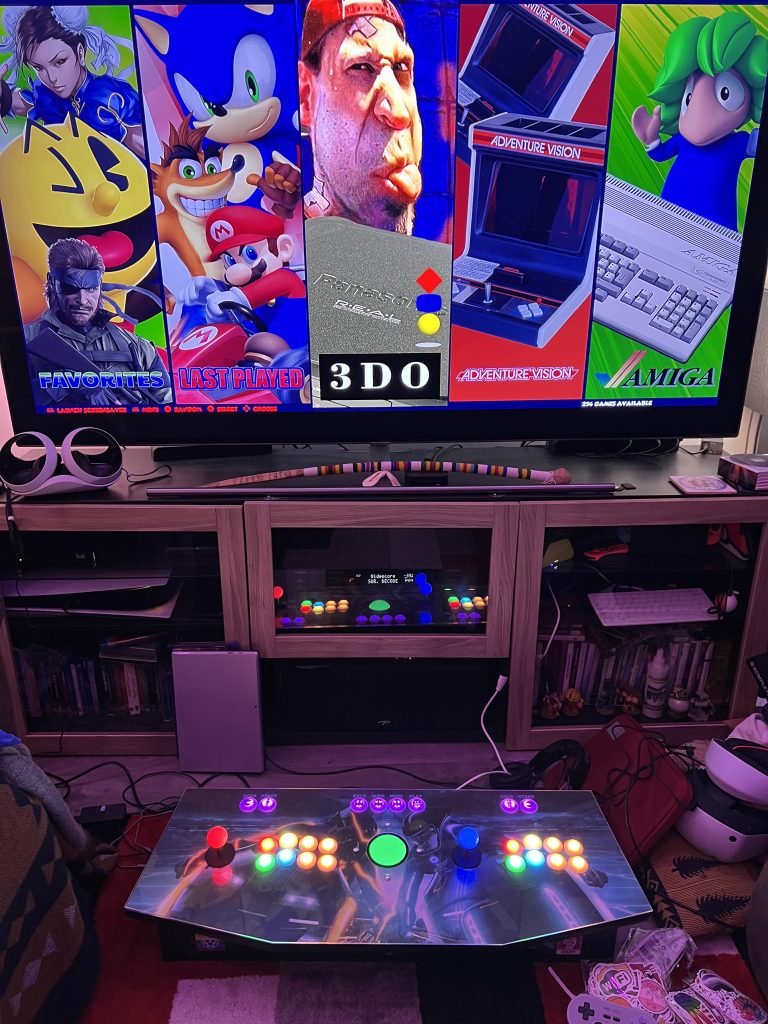
About two years ago, I was inspired by my partner Sté to put together my own arcade game console with buttons, two joysticks, blinky LEDS and make it Raspberry Pi and RetroPie-based.
It was a great project to start during the COVID-19 Pandemic, but I ran into an issue when one of the vendors sent me the wrong cables. I finally got around to sorting this out and got the controller up and running.
I’m putting this together so that anyone who wants to do something similar with RetoPie can do so. There were some hoops I had to jump through to get this working, mainly around drivers that were no longer available, but re-found courtesy of the Internet Archives.
Crucial X8 4Tb SSD – I wanted something fast, relatively low power, and efficient for space. I also have curated a significantly large image of games from the 70s to early 2000s. Previously I was using a WD 4Tb My Passport which does the trick and thankfully I was able to copy the image to the SDD.
Atolla USB Hub – While it seems I can power the SDD from the Raspberry Pi directly, I wanted to make sure I had a powered USB hub to help with power.
Various cables
USB A-USB C cable for power to the Raspberry Pi from the USB hub
Power cable for the Ultimate I/O board to power LEDs
Micro USB-USB A for the Ultimate I/O board for cotrol
Micro HDMI to HDMI and with a female to female converter to hook up to my TV
A lesson learned
I originally bought a set of buttons and a controller from Amazon or Aliexpress, and while it sort of worked, I ran into an issue with keyboard emulation. From what I recall, I couldn’t use two of these controllers at the same time for the two different sides, or something else. It’s been a while. I know I also had some issues with powering the LEDs on those buttons.
I was also frustrated because the buttons were really brittle so taking off the switches broke the harness that the switch sits in.
Setting it up
When ordering the Ultimate I/O board make sure you go with the 4.8 mm switch connector. The buttons had 4.8 mm connectors, not the 2.8 mm which are for the Goldleaf connectors. I had ordered the 4.8 mm harness with mine, and Ultimarc sent me the 4.8 mm and 2.8 mm version.
Wiring is not too hard, but a few tips:
Make a note of where you’re connecting your LEDs for the buttons as you’ll need the port numbers for programming/configuration later
Pay attention to the switch harness and what wire goes to which button as they are specific
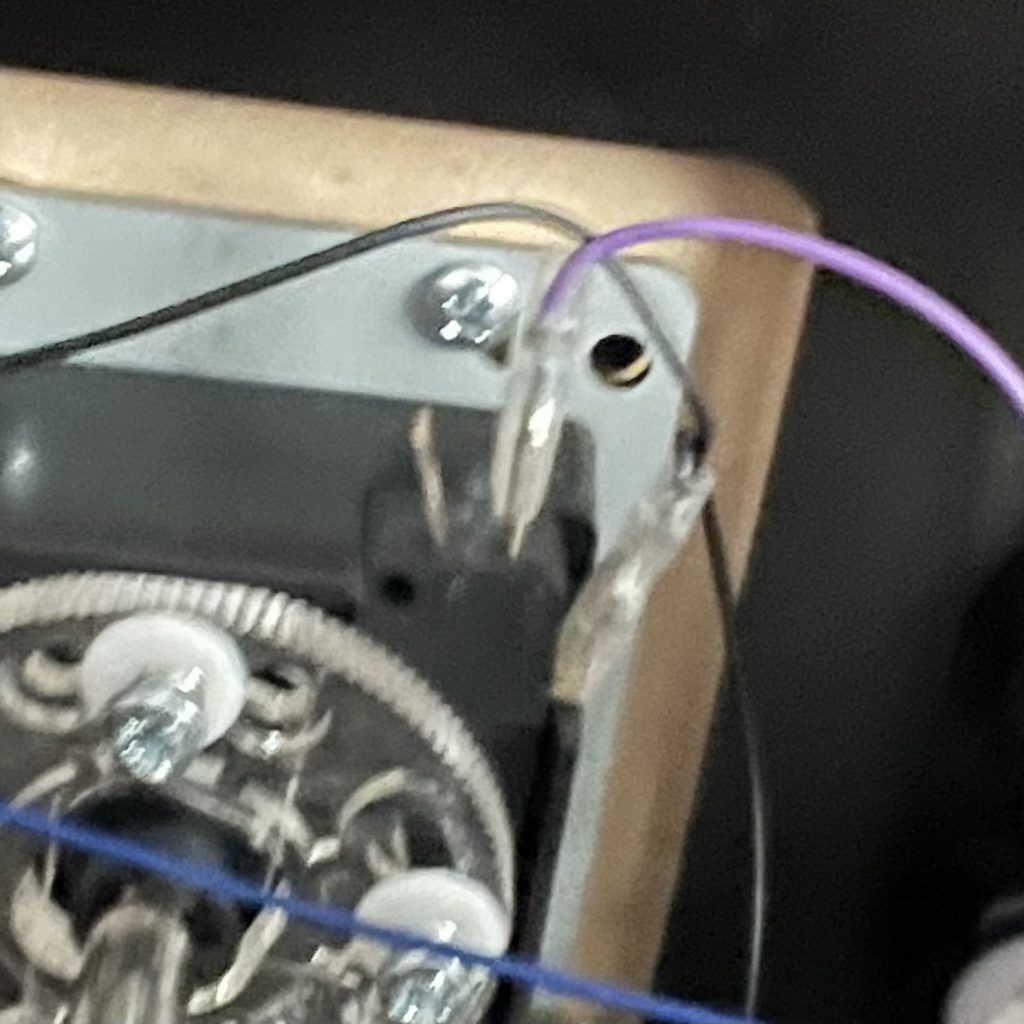
Buttons for Joysticks and Buttons themselves often have two connectors – for the signal wire. I found that you want to connect the signal wire to the terminal closest to the ground. Otherwise it assumes the switch is closed when you’re not pressing the button rather than open:
Keyboard or Xbox 360 Mode?
The Ultimarc I/O board can switch between multiple modes – Keyboard, dInput, and Xbox 360 mode. I didn’t explore much with dInput mode as I’ve had good experiences with both Keyboards and Xbox controllers with RetroPie.
There is once big caveat – If you use Xbox mode, you cannot control the LEDs on the board. As I understand it, Microsoft locks down the abilities of boards that emulate Xbox controllers in their protocols, and so you cannot control the LEDs.
That said, two controllers are clearly visible in Xbox mode and it works well. Just be sure to program the triggers to the proper Coin and Start buttons if you use this mode. If you’re not using LEDs, this could work for you.
Now, what is the challenge if you use Keyboard mode with RetroPie? Well…out of the box, you can only setup the keyboard as a single player device, you can’t have two distinct set of controllers and control them as Player 1 and 2 separately.
If you try to setup both sides, you end up wiping out the controls for the other player. So if I setup Player 1 and then setup Player 2, I end up wiping out the Player 2 controls.
Attempt #1: xboxdrv
Update 2023-08-31: I thought xboxdrv to the rescue, but it actually didn’t work. Sure enough, it turned my keyboard into an Xbox controller, but only one controller, not two.
So you can’t say one part of the keyboard is player 1, and another part is player 2. ARGH!
Here is what I had previously written:
xboxdrv allows you to setup a single keyboard-like device as two controllers (nope!). So your device still acts like a keyboard, and the driver converts the keypresses as if it were an Xbox controller. Perfect for what I needed so I can control the LEDs and have two controllers.
Ultimately what got me over the hurdle was the –next-controller command. Here is the command line I ended up using for the base configuration of my Ultimate I/O:
This works perfectly for what I wanted. Definitely use the by-id approach as that guarantees the Ultimarc Game Controller is used rather than any other plug and play device.
Nope, that did not work – I suspect I had my keyboard plugged in at the time.
A real shame, because if someone could get the OS to interpret two different parts of the keyboard as a joystick, then that would be awesome.
Attempt #2: Update retroarch.cfg
Ultimately, I had to follow the page on Keyboard controllers at Retopie and setup retroarch.cfg for all systems to use the keyboard as player 1 and player 2. This works well with Retroarch and definitely, two people can play head to head with the controller AND I can use the RGB lights.
There’s a problem though. What if I wanted to play a game like Gauntlet with four people, two on the controller, and two on wireless joysticks?
It seems that for now, I’m a bit out of luck unless I use a tool like Retropie Joystick Selection and force a joystick to be used for player 3 and 4. It’s kludgy but it works. It would be nice if this were available through the Emulation Station UI so I don’t have to login to my Raspberry Pi to make the changes.
Now, for practicality sake, how many people will actually use the controller directly versus using wireless controllers? Most people will likely play games with wireless controllers as our living room is in a bit of an odd layout with the couches perpendicular to the television.
Wireless Controllers?
Of course! I want friends to be able to play games like Gauntlet – very much a favourite – which supports up to 4 players. This was a big deal when Atari came out with the game, and very much my kind of D&D-like game to throw virtual quarters at.
I’m using 8BitDo SN30s and Ultimates in my build. The Ultimates will be the primary controllers for player 1 and 2, with the SN30s for player 3 and 4, or if preferred, someone can use the SN30s.
How about that LED Lighting?
Ultimarc suggests using RGB Commander, however clicking the link, RGB Commander no longer exists. Doing a search, RGB Commander is nowhere to be found.
Welcome to the Internet Wayback Machine – You can download version 4.0.5 here, which was the last version.
Much thanks to Gijsbrecht De Waegeneer – if there is a way I can support you in the future, I’d like to through a donation, or some other means. Even if I could host or even take over the code, it’s clear there is demand for RGB Commander.
RBG Commander has two config files:
rgbcmdd.xml which defines the actual behaviour of the LEDs and RGB Commander
Animation files in the rgba folder
Some tips about RGB Commander:
You can setup a static pattern, you don’t always have to use an Animation
When creating your own RGBA file, use three values to set RGB
When you start programming the RGB values on the right side, I have noticed that I had to program the values not in R, G, B triplets but in B, G, R – I’m double checking to make sure I’ve not plugged in my LEDs backwards on the board
It’s not hard to program but will take some experimenting with the setup to understand which LED is represented by each triplet
I’ve not linked the application up to specific emulators and tested that, yet
I left the default animation on boot up of the Ultimate I/O card as-is – It’s almost like it’s linked to boot up of RetroPie, which it really isn’t, it isn’t like it’s a progress indicator per se, but you know RetroPie is fully loaded when my default animation starts playing. Neat!
Next up is figuring out how to get buttons to show up in the various emulators.
What else?
If you want to add external USB-based hand held controllers you can. IDs for the devices, i.e. which is the first, second, third or fourth controller seems to be determined based on the order in which they are connected to the USB hub. Play around with this on your hub. I could actually be quite wrong.
Conclusion
This has been an epic project, a bit delayed, but I got it done and I’m super pleased with the results.
This completely replaces a Raspberry Pi 400, USB hub and wireless controllers I had setup as part of my home entertainment setup and puts everything into a very accessible, expandable box. It also frees up the living room Raspberry Pi 400 for other projects.
What’s Next? I’m not planning on putting this in its own arcade cabinet as I already have an AtGames Legends Ultimate with AwesomeSaUCE and CoinOpsX. I am thinking of getting a wide IKEA Lack TV Bench or Coffee Table to put the console on as it’s a bit difficult to sit on the floor comfortably although it does give me significant modern 80s retro vibes and memories.