
Retropie Console – The Arcade Cabinet Owner’s Manual Nobody Thinks to Write

An arcade cabinet feels finished when the games launch, the controls respond, the marquee changes, and the buttons glow.

That is usually the moment when nobody thinks to write the manual.

The wiring is still fresh in memory. The unusual startup command is obvious because it was edited yesterday. We remember which controller must use X mode, why one group of RGB pins appears backwards, and which service creates the virtual Player 1 device. If something breaks, surely we will remember what we did.

Then six months pass.

The cabinet still looks like one machine, but it is actually a collection of systems that happen to start together: Raspberry Pi hardware, a Linux operating system, RetroPie, EmulationStation, emulator cores, an I-PAC, wireless controllers, virtual input devices, RGB lighting, a Pixelcade marquee, a Sinden Lightgun, launch hooks, metadata tools, ROM collections, BIOS files, configuration archives, and a four-terabyte SSD.

The hard part of maintaining it is rarely remembering that those components exist. It is remembering why they were connected in precisely this way.

That is why we wrote an owner and service manual.

A custom cabinet is an integration, not an appliance

A commercial appliance usually has a defined model number, a factory configuration, and a manual written by the organization that designed the whole product.

A custom arcade cabinet has manufacturers for its individual parts, but no manufacturer for the assembled system.

Ultimarc can document the I-PAC Ultimate I/O. Raspberry Pi can document the computer. RetroPie can document its setup scripts. Pixelcade can document its listener. Sinden can document the lightgun. None of them can describe what happens when all of those components share this cabinet’s USB buses, startup sequence, controller mappings, lighting rules, and recovery process.

Only the owner can document the integration.

Our manuals therefore serves three different purposes:

  • a quick operating guide;
  • a reference to the emulators used and different configurations;
  • a technical service reference; and
  • a disaster-recovery starting point.

Those purposes overlap, but they are not identical. The person turning off the cabinet needs a short, safe procedure. The person diagnosing a missing Player 2 controller needs device identities, service names, and expected mappings. The person rebuilding a failed drive needs file locations, dependencies, backups, and evidence of the last known-good state.

Trying to make one undifferentiated list satisfy all three audiences produces a document nobody can use. We organized ours around questions.

Start with the questions a future owner will ask

The manual’s navigation is based on practical needs:

QuestionInformation required
How do I start or shut down the cabinet safely?Power sequence, front-end procedure and expected startup behavior
What hardware is installed?Exact models, quantities, connections and intended roles
Why does this USB device have several names?Kernel nodes, stable identities, aliases and physical topology
Which controls should work for each player?Physical layout, raw inputs, logical mappings and known exceptions
Why are these RGB pins backwards?Wiring evidence and the required Player 2 BGR compensation
What starts automatically?Services, launch hooks, dependencies and expected status
Which emulator runs this title?System defaults, per-game overrides, BIOS requirements and test titles
What do I back up?Configuration payloads, ROM and BIOS boundaries, full-drive image and checksums
How do I know a repair worked?Commands, expected results and end-to-end tests

This changes the tone of the document. It is not a catalogue assembled for its own sake. Every detail should help someone operate, diagnose, change, or recover the machine.

Record what is observed, not what seems likely

The cabinet provided an early example of why assumptions are dangerous.

The Raspberry Pi 4 has a 64-bit processor. The running kernel reports aarch64. It would have been natural to describe the installation as a 64-bit operating system.

The live package architecture told a more precise story:

Hardware:   Raspberry Pi 4 with a 64-bit-capable CPU
Kernel:     aarch64
Userspace:  32-bit armhf
OS release: Raspbian GNU/Linux 10 (Buster)

That distinction explained why a 64-bit Pixelcade executable could exist on disk yet fail with the misleading message No such file or directory. The program required a loader that the 32-bit userspace did not provide. Replacing it with the correct ARMv7 build resolved the problem.

“Raspberry Pi 4” was true but insufficient. “64-bit kernel” was also true but insufficient. The combination of hardware, kernel, userspace, and actual executable format was the useful fact.

We use that standard throughout the manual:

  • live output is stronger than an assumption based on hardware;
  • a running process is stronger than an installer description;
  • an exact device property is stronger than a temporary /dev number;
  • a photographed lighting result is stronger than an attractive-looking XML file; and
  • a game tested from launch through exit is stronger than a configuration that merely parses.

Document reasons as carefully as settings

A configuration file can tell a future maintainer what value is present. It rarely explains why changing it would be a mistake.

Player 2’s RGB pin triplets are a good example. They descend where Player 1’s values ascend because that side of the panel is physically wired in BGR order. Tidying the numbers would swap red and blue across the right side of the cabinet.

The I-PAC provides another. It is kept in Dual DInput mode because the panel must appear as two game controllers while the cabinet’s real keyboard remains available to emulated computers. Returning it to keyboard mode might simplify one old tool while reintroducing conflicts throughout the rest of the system.

The controller merger exists because four physical gamepads should become two logical players:

I-PAC Player 1 + first 8BitDo  ──> Arcade Merged Player 1
I-PAC Player 2 + second 8BitDo ──> Arcade Merged Player 2

The trackball merger is activated only for listed games because globally taking control of mouse-like devices would interfere with classic computers, adventure games, and other pointer-driven software.

The Pixelcade listener uses a USB by-id path because ttyACM0 and ttyACM1 exchanged roles after reboot. The numbered nodes were observations from one boot, not hardware identities.

These explanations turn configuration trivia into engineering decisions. Without them, a future repair can easily undo the solution while appearing to simplify the system.

Map the whole path from hardware to game

Input problems are particularly hard when documentation stops at the physical panel or begins only inside an emulator.

Our manual follows the path through every layer:

Physical button or controller
        ↓
Linux input device and USB identity
        ↓
Translation or virtual-device service
        ↓
RetroArch player assignment
        ↓
Emulator or MAME input type
        ↓
Observed behavior in a game

That path revealed details which would otherwise be almost impossible to reconstruct from memory. Player 1 and Player 2 report Coin and Start in opposite raw button order. The virtual-controller service normalizes those inputs before RetroArch sees them. MAME uses the resulting stable Joy 1 and Joy 2 devices, with global input types named START1, START2, COIN1, and COIN2.

The manual also records known imperfections. At the time of testing, the fourth action-button column did not emit DInput events. That is not hidden simply because most games do not need those buttons. A service document should distinguish “working and verified,” “installed but untested,” and “known follow-up.”

Give every custom service an address

Custom integrations become much less mysterious once their active locations are recorded.

The manual and its companion technical reference identify components such as:

/usr/local/sbin/arcade-gamepad-merger
/usr/local/sbin/arcade-trackball-merger
/usr/local/sbin/arcade-trackball-game-hook
/etc/systemd/system/arcade-gamepad-merger.service
/etc/systemd/system/arcade-trackball-merger.service
/opt/retropie/configs/all/runcommand-onstart.sh
/opt/retropie/configs/all/runcommand-onend.sh
/usr/sbin/rgbcommander/rgbcmdd.xml
/opt/retropie/configs/all/autostart.sh

A useful service entry includes more than a pathname. It explains:

  • what starts it;
  • which hardware or files it depends on;
  • what other component consumes its output;
  • how to check whether it is running;
  • where its logs appear;
  • what normal success looks like; and
  • what else will fail if it is absent.

This allows troubleshooting to proceed in layers. We can ask whether Linux sees a physical controller, whether the merger reads it, whether the virtual device exists, whether RetroArch selects it, and whether MAME receives the expected input. “The controls do not work” becomes a series of answerable questions.

Use test titles as part of the documentation

An emulator inventory tells us what is installed. It does not tell us whether the surrounding integration works.

We record representative games as regression tests. Bubble Bobble helped verify two-player MAME controls. Demon Attack became the recovery and regression title for the custom IBM PCjr cartridge launcher. Marble Madness verifies the conditional trackball merger.

A named test title is valuable because it fixes several variables at once:

  • the ROM exists;
  • its launch path is known;
  • its emulator selection is known;
  • its controls have an expected behavior; and
  • a previous successful run provides a comparison.

“Test the PCjr” leaves too much room for interpretation. “Launch Demon Attack and confirm immediate joystick movement, firing, and a clean status-zero exit in the launcher log” is a service procedure.

Separate quick backups from complete recovery

Our RetroPie installation occupies a four-terabyte SSD. A raw drive image is the most complete recovery artifact because it captures the partition table, boot files, operating system, installed software, configuration, and data exactly as they exist.

It is also enormous and slow to create.

The manual therefore defines two complementary backup levels.

Configuration snapshots

Frequent snapshots preserve the files that embody our custom work:

  • RetroPie and emulator configuration;
  • virtual-controller and trackball scripts;
  • systemd services;
  • launch hooks;
  • RGB Commander configuration and animations;
  • controller profiles;
  • current gamelists;
  • metadata tools; and
  • selected recovery records.

The backup and restore scripts are kept payload-symmetric: every archive the backup creates has a corresponding restore path. Manifests, checksums, and README records are used to validate a snapshot rather than being copied blindly into the live filesystem.

Full-drive images

A full image is slower but protects against failure of the boot drive or the loss of installed package state. The manual records the SSD’s model, capacity, partition scheme, and observed macOS disk identifier—while warning that the identifier must be reconfirmed every time.

That warning is not decorative. Reversing the input and output of dd can destroy the wrong disk.

I keep one precious backup image, two current backup images on two NASes, and offsite backups with friends.

ROM and BIOS preservation is also stated explicitly. The configuration snapshot intentionally excludes BIOS files. The complete BIOS directory and ROM library require their own preservation strategy or the full-drive image. I have several copies of both across my two NASes and an additional hard drive.

A backup policy is only trustworthy when it records what is absent as clearly as what is included.

Add photographs and a change log

Some cabinet facts are easier to prove visually than verbally.

We retain photographs of the default illuminated panel – a ColecoVision calibration pattern, and the console at boot up. Those images establish physical button positions and show what a successful lighting profile looked like on the real hardware.

The change log then records when a behavior changed and how it was validated. Entries include XML checks, live service inspection, hardware tests, game launches, backup audits, and recovery dry runs.

This prevents the manual from pretending to be timeless. It is a record of a changing machine. A statement verified against the running cabinet has a date and a basis. When the system changes again, we know which conclusions require retesting.

Writing the manual with an agent

The manual itself was developed through agentic work under my direction.

That did not mean asking an AI to invent documentation from a list of products. We used the agent to inspect the real system, correlate configuration files, read service status and logs, compare documentation with live behavior, identify contradictions, organize the results, and maintain both focused references and the consolidated manual.

I built up trust in the agent. I started small with some small fixes, and built up to granting it full access to my Retropie console to make direct changes as we fixed issues and built tools. It preformed flawlessly and that built up a corpus of knowledge about the inner workings of the console. It completed months of work in a matter of a few days.

I supplied the intent, physical context, acceptance decisions, and hands-on validation. The agent supplied persistence across hundreds of small details and the ability to trace relationships that crossed several subsystems.

This division of work proved particularly useful during documentation audits – a human MUST be in the loop, and the agent provided a wholistic view of everything.

A claim in one guide could be compared with the running operating system, a service file, the contents of a backup script, and the behavior recorded in another troubleshooting session. When the evidence disagreed, the document was corrected rather than averaging the stories together.

Human-in-the-loop matters here for the same reason it mattered in the metadata project. A generated paragraph can sound authoritative while being wrong. The cabinet, its files, its logs, and its observed behavior remain authoritative. The agent helps turn that evidence into durable knowledge.

That’s what people miss about using artificial intelligence – a human is prescriptive, directs and provides clarity, and a human must be in the loop to review.

The manual is part of the machine

The final documentation is not one giant file trying to contain everything. The owner and service manual provides the map, while companion references hold detailed lighting profiles, controller integration, maintenance tools, and the system-and-emulator inventory. Markdown remains easy to search and revise; generated PDFs provide convenient archival and offline copies.

The documentation archive belongs beside the working cabinet and beside its backups. If the only copy of the recovery instructions lives on the drive that fails, that is not a recovery plan.

More importantly, the manual is treated as another maintained component. When we add a system, change a controller mode, update a service, alter the USB arrangement, or discover that an old assumption was wrong, the documentation changes with it.

That may be the most important idea in the entire project.

The cabinet’s most valuable knowledge is not merely which files exist. It is why the machine works, how we know it works, and how to recognize when it no longer does.

Nobody thinks to write that manual while the attract mode is running and everything feels finished.

We did—and the cabinet is more maintainable because of it.

Retropie Console – Two trackballs, one console

For this console, I have duplicate controllers. I have the arcade console that has two joysticks, buttons and a trackball. I have two 8BitDo Ultimate Controllers and a Logitech MX Ergo. Why? Sometimes I want to use the arcade panel, sometimes I want to sit on the couch, I might want multiple players too.

Marble Madness is one of those games that immediately explains why an arcade cabinet needs a trackball. I grew up playing this game with a joystick on a Commodore 64, and it is painful to play that way. This game needs a trackball, just as Duck Hunt needs a lightgun, just as the original arcade game was designed. The speed, momentum, diagonals, narrow paths, and frantic changes in direction all feel different when the control is a rolling ball rather than a joystick or D-pad.

Our cabinet has a trackball built into the centre of its control panel. We also use a Logitech MX Ergo, which is convenient when sitting farther back or when someone would rather use a handheld thumb-operated trackball.

Although, the MX was purchased for a different purpose – to help with Amiga emulation, and the added benefit is that it can be used for trackball games.

The requirement sounded uncomplicated:

  • launch Marble Madness;
  • roll either physical trackball; and
  • have the game respond as though there were one consistent Player 1 trackball.

As with many seemingly small arcade-cabinet requirements, the difficult part was not getting each device to work. The difficult part was making both devices behave predictably without changing how every other mouse-driven game and computer system behaved.

Two working devices do not automatically become one control

Linux can detect multiple mouse-like devices at the same time. The panel trackball and the MX Ergo can each produce pointer movement, and diagnostic tools can see their events.

That does not guarantee that an emulator will combine them in the way we want.

An application may select one mouse index, choose whichever device it discovers first, or remember a device assignment that changes after a reboot. A configuration that works while the panel trackball is Mouse 1 can fail when the wireless receiver appears first and changes the order.

This is the same category of problem we encountered with gamepads and USB serial devices elsewhere in the cabinet: a temporary device number is not a durable identity, and several physical devices do not automatically represent one logical player.

We could have tried to configure MAME to understand both physical devices directly. That would have pushed hardware-specific knowledge into the emulator, however, and it would have made the result dependent on device enumeration and MAME input details.

Instead, we gave the emulator one stable control.

Creating one virtual trackball

We built a small service called:

/usr/local/sbin/arcade-trackball-merger

Its job is to combine movement from the two approved physical sources into one virtual pointer:

Panel trackball ─────┐
                     ├── Virtual Player 1 trackball ──> MAME
Logitech MX Ergo ────┘

MAME no longer has to decide which physical trackball is Player 1. It receives one logical device. Movement from either source reaches the same destination.

This is an important separation of responsibilities:

  • Linux still detects the physical hardware;
  • the merger understands which devices are acceptable sources;
  • the virtual device represents the control the game needs; and
  • MAME maps that one stable logical device.

The idea is similar to the cabinet’s virtual gamepad arrangement, where an I-PAC panel side and an assigned wireless controller become alternate inputs for one player. The trackball implementation is narrower because mouse-like devices affect more than arcade games.

Why we did not merge the trackballs globally

A global merger would have been easy to describe: start it at boot and leave it active forever.

It would also have been too broad.

The cabinet runs classic computers, adventure-game engines, menus, ports, and other software that can use a mouse or trackball. Some of those programs should see the panel trackball normally. Others may need the Razer mouse, the MX Ergo, or their own device selection. Taking exclusive control of the physical devices throughout the entire session could make those systems harder to use.

Our actual requirement was much smaller: either trackball should control Marble Madness.

We therefore made activation game-specific.

The list of games that request merged-trackball behavior is stored in:

/opt/retropie/configs/all/arcade-trackball-games.txt

At the time of writing, it contains the known Marble Madness ROM basenames:

marble
marble2
marble3
marble4
marble5

Using ROM basenames rather than a display title matters. A front-end title may be reformatted, translated, or supplied by metadata, while the launch hook receives the actual file being started. The basename gives the automation a small and explicit allowlist.

The rule is effectively:

IF system is mame-libretro
AND ROM basename is in arcade-trackball-games.txt
THEN activate exclusive trackball merging
ELSE leave the physical pointer devices alone

This is a useful design principle for cabinet automation: apply unusual behavior only where it is needed.

Connecting the merger to a game launch

RetroPie provides launch hooks that run around an emulator session. Our start hook is:

/opt/retropie/configs/all/runcommand-onstart.sh

When a game begins, that hook performs three independent jobs:

  1. It notifies RGB Commander, with a two-second limit so a lighting problem cannot prevent the game from starting.
  2. It resolves the cabinet’s virtual Player 1 and Player 2 gamepads for Libretro.
  3. It asks the trackball game hook whether this launch requires the merged pointer.

The trackball-specific decision is handled by:

/usr/local/sbin/arcade-trackball-game-hook

Before evaluating the new launch, the hook clears stale state. It then checks both the system name and ROM basename. Only an approved mame-libretro title activates the exclusive merge.

When the emulator closes, RetroPie’s end hook runs:

/opt/retropie/configs/all/runcommand-onend.sh

That deactivates the trackball merge and releases the physical devices. The next program once again sees the ordinary mouse and trackball arrangement.

Cleaning up at both ends is deliberate. The end hook handles a normal exit, while clearing stale state at the next start prevents an earlier abnormal termination from permanently contaminating later launches.

The service and the policy are separate

The virtual trackball service is managed by systemd:

arcade-trackball-merger.service

The service provides the mechanism. The game list and launch hook provide the policy.

That distinction makes the setup easier to maintain. Adding another compatible trackball game does not require rewriting the merger. We can review the game, add its exact ROM basename to the allowlist, launch it, and test whether its MAME mapping behaves correctly.

The relevant diagnostic commands are:

systemctl status arcade-trackball-merger.service --no-pager
journalctl -u arcade-trackball-merger.service -b --no-pager

The service status tells us whether the mechanism is available. The journal tells us what happened during discovery and activation. If Marble Madness launches but only one source works, we can examine the physical input events, the service log, and the virtual output separately instead of treating the whole path as one opaque configuration.

Testing the behavior that matters

A successful service start is not the acceptance test. The user experience is.

We test the complete sequence:

  1. Start in EmulationStation with both physical trackballs available normally.
  2. Launch a listed Marble Madness ROM.
  3. Confirm that the panel trackball moves the marble in both axes.
  4. Confirm that the MX Ergo moves the same player without changing the MAME input assignment.
  5. Alternate between the two devices during the same session.
  6. Exit the game.
  7. Confirm that the physical pointer devices have been released.
  8. Launch a non-listed mouse or trackball application and confirm that it retains its ordinary behavior.
  9. Reboot and repeat the test so success does not depend on device discovery order.

That last test is important. A setup that works only until the next reboot is not a finished cabinet feature.

Building the solution with an agent

As with the cabinet’s controller and metadata tools, the supporting code was developed agentically under my direction.

I defined the behavior and the boundaries: both trackballs should operate Player 1 in Marble Madness, the physical devices should remain normal elsewhere, game selection should be explicit, a failed lighting action must not block a launch, and the result had to survive both game exit and reboot.

The agent helped inspect device behavior, connect the requirement to RetroPie’s launch hooks, implement the merger and allowlist, examine service logs, and refine cleanup behavior. The actual cabinet remained the source of truth. We tested physical movement and game behavior rather than accepting a syntactically correct service file as proof.

This is the kind of task for which agentic development is particularly useful. The individual pieces—Linux input events, virtual devices, systemd, shell hooks, and MAME configuration—are not enormous. The difficulty lies in following their interaction across an entire launch lifecycle and noticing where a broad solution would introduce a new problem.

The human contribution is deciding what “correct” means. Here, correct did not mean “Linux can see two trackballs.” It meant:

  • either trackball controls the same marble;
  • only selected games receive the merged behavior;
  • other pointer-driven systems are unaffected;
  • cleanup occurs after play; and
  • the design can be understood and recovered later.

The larger lesson

The final experience is exactly as simple as we wanted. Launch Marble Madness and use whichever trackball feels right.

That simplicity exists because the complexity has been placed at a deliberate boundary. The game sees one stable logical control. The merger understands the physical alternatives. The launch hooks decide when that behavior is appropriate. Everything else continues to work normally.

Good cabinet integration often looks like nothing happened. There is no controller-selection menu and no instruction to unplug one device before using another. The player rolls a ball, and the marble moves.

That is the entire point.

Retropie Console – Journeys in legacy software installation and USB conflicts

In this arcade project, I’ve chosen to use deprecated solutions often not out of choice, but because despite my best searches, other tools and options seemed not to be available at the time, and I haven’t had time or capacity to build my own.

Screenshot

I’m a big fan of reuse. Why reinvent the wheel when most of the work has been done already and all we need to do is a tweak?

I did this with RGB Commander, and I’ve somewhat done something similar with Pixelcade.

When I found Pixelcade, I attempted an initial install and failed with the V2 instructions. While trying to figure this out, I stumbled on a previous version of the installation page at https://pixelcade.org/pi-install/

Legacy Version – DO NOT USE

There is a particular kind of anxiety that comes from revisiting the installation guide for a working piece of software and finding a large warning at the top. Let’s give it a try, and if I fail, I’ll figure out how to clean this up.

Our cabinet is not a new installation. It’s been slowly curated, cleaned up, and augmented for several years.

It has a working AtGames Legends BitPixel display integrated with RetroPie, EmulationStation, a Raspberry Pi 4, and a Sinden Lightgun among other devices. It starts automatically, follows the system and game selection in the front end, displays artwork, and exposes its companion interface over the network.

I’m documenting this part of the journey for anyone who may be in a similar situation.

What the Pixelcade adds to the cabinet

The BitPixel acts as an active marquee. As we move between systems and games in EmulationStation, the display changes to matching artwork. When a game starts, Pixelcade can show its marquee, scroll “Now Playing” text, and—in supported MAME configurations—cycle high scores.

This behavior is not implemented by one isolated program. Pixelcade sits across several layers of the cabinet:

USB BitPixel hardware
        ↕
Linux device identity and udev rules
        ↕
Pixelcade listener and artwork
        ↕
RetroPie startup configuration
        ↕
EmulationStation event scripts
        ↕
System and game selection

Which architecture and how do we get USB consistent?

The original Java-based installation got the BitPixel running, but the Sinden Lightgun exposed a USB serial-port conflict. Solving that eventually led us to Pixelcade’s newer native listener, an architecture mismatch, a stable device path, and a startup configuration that survives USB numbering changes.

The Raspberry Pi 4 and the version of the OS, which I’m using for this project, has a 64-bit kernel and a 32-bit user space, which means we have to be careful about the software we install. Looking only at uname -m made the machine appear to need an ARM64 program. Programs installed through the operating system actually needed 32-bit ARM binaries.

To be clear, the 32-bit user space is a result of the old operating system I’m using behind RetroPie. We don’t specifically need a fully 64-bit operating system.

Rant: I find it frustrating that there isn’t an upgrade path other than wiping and starting new with Raspberry Pi OS. There’s got to be a better way of migrating easily. Especially given we could test on Raspberry Pi OS 12 Bookworm which supports both 32-bit and 64-bit executables on the Pi4, so we can gradually upgrade to 64-bit emulators which can then better leverage the Mesa and OpenGL drivers and Vulkan support. That, is for another day.

The legacy Pixelcade instructions did work. Their installer did much more than copy one program. It installed Java, created /home/pi/pixelcade, copied artwork, added a Pixelcade listener to RetroPie’s startup, installed fonts, and added EmulationStation event scripts.

This worked beautifully, although Pixelweb, which allows us to download updated artwork, upgrade the software and control the Bitpixel display independent of the console didn’t work.

Still, that gave us an important baseline: We were able to confirm the BitPixel hardware, its USB connection, the artwork, and the EmulationStation integration were all capable of working on the cabinet.

The Sinden Lightgun uses both a camera device and a USB serial interface. When we began configuring it, the gun appeared to be connected correctly, but its software could not claim the serial port it needed.

We checked which process owned the device:

sudo fuser -v /dev/ttyACM0
ps -ef | grep '[j]ava'

The result identified the conflict:

/dev/ttyACM0:  java
java -jar pixelweb.jar -b -s

Pixelcade’s documentation specifically calls out potential conflicts with devices such as Sinden lightguns and USB volume-control boards.

Pixelcade’s Java listener was scanning the available serial devices and had opened the Sinden’s port. The marquee was working, but it had accidentally claimed the lightgun.

Temporarily stopping pixelweb.jar released the port and let the Sinden software proceed. That gave us a useful diagnostic split: both devices worked independently, but automatic serial discovery allowed one to interfere with the other.

Device numbers were not identities

With both devices connected, Linux created paths such as:

/dev/ttyACM0
/dev/ttyACM1

At one point the Sinden was ttyACM0 and the Pixelcade IOIO controller was ttyACM1. After a reboot, they could swap.

Hard-coding – which I’m never a fan of – one of those numbers would therefore make the fix temporary. We needed to identify the hardware rather than its discovery order.

Linux already provided stable paths under /dev/serial/by-id/:

/dev/serial/by-id/usb-IOIO_Open-Source_Project_IOIO-if00
/dev/serial/by-id/usb-Unknown_SindenLightgun_HIDLG-if00

The first path identifies the Pixelcade’s IOIO interface. The second identifies the Sinden. The names continue to point to the right hardware even when the underlying ttyACM numbers change.

The Pixelcade udev rule may additionally create an alias named /dev/PIXELCADE0 or /dev/PIXELCADE1. We saw /dev/PIXELCADE1 point to the same ttyACM1 device as the IOIO by-id path during troubleshooting. We did not use either numbered Pixelcade alias in the final startup command; the IOIO by-id path is more explicit and remained correct when the raw device numbers swapped.

The different ways Linux can recognize a USB device

Linux exposes several views of the same USB hardware. They answer different questions, and not all of them are equally suitable for configuration.

IdentityExampleWhat it tells usStability
Kernel device node/dev/ttyACM0The device class and the order in which the kernel discovered itConvenient, but the number can change at reboot or reconnection
USB bus addressBus 001 Device 006 from lsusbWhere the device is during this bootTemporary; the device number changes
Vendor and product IDvvvv:pppp from lsusbThe manufacturer and product typeUsually stable for a model, but not unique when two identical devices are attached
Serial-based link/dev/serial/by-id/...Identity derived from USB descriptors, often including a serial numberUsually the best application path when the device supplies a useful unique identity
Physical-path link/dev/serial/by-path/...The USB port and hub route through which the device is connectedStable if the cabling and ports stay fixed; changes when the device is moved
udev propertiesID_SERIAL, ID_VENDOR_ID, ID_MODEL_ID, ID_PATHNormalized metadata that rules and services can matchAs stable as the underlying property
Sysfs path and attributes/sys/bus/usb/devices/...The kernel’s complete device tree, interfaces, driver and raw attributesAuthoritative for inspection; parts of the path reflect USB topology
Custom udev alias/dev/pixelcadeA human-readable link created from chosen matching propertiesStable when the rule uniquely identifies the intended hardware

Other device classes have equivalent link directories. Game controllers may appear under /dev/input/by-id/ and /dev/input/by-path/; cameras can have /dev/v4l/by-id/; storage devices add identities such as /dev/disk/by-id/, /dev/disk/by-label/, and /dev/disk/by-uuid/. A filesystem UUID is excellent for mounting a drive, but it does not identify a serial controller or camera.

There are two important caveats. A vendor/product pair identifies a type of device rather than one physical unit. Also, some hardware does not provide a unique serial number. In those cases, by-id may not distinguish two identical units, and by-path or a rule tied to a known physical USB port may be the better choice.

A single USB product can also be a composite device: one physical cable can expose a serial interface, camera, audio device, keyboard or several of these at once. The interface number—often visible as if00, if01, or the ID_USB_INTERFACE_NUM property—can therefore matter just as much as the vendor, product and serial values.

These commands show the device from several angles:

lsusb
lsusb -t
ls -l /dev/serial/by-id/ /dev/serial/by-path/
readlink -f /dev/serial/by-id/usb-IOIO_Open-Source_Project_IOIO-if00
udevadm info --query=property --name=/dev/ttyACM0
udevadm info --attribute-walk --name=/dev/ttyACM0

lsusb is useful for discovery. lsusb -t shows the hub topology and active drivers. udevadm info connects a /dev node to the properties and parent attributes from which a durable rule can be built.

A short primer on udev

The kernel detects the hardware and emits an event. The userspace device manager, udev, receives that event, evaluates its rules, sets permissions and creates the useful symbolic links under /dev. In other words, /dev/serial/by-id/... is not a second serial device—it is another name pointing to the same underlying ttyACM node.

Distribution and package rules normally live under /lib/udev/rules.d/ on this Buster system. Local rules belong under /etc/udev/rules.d/, which keeps cabinet-specific changes separate from files managed by installed packages. Rule files are processed in lexical order, so a descriptive late filename such as 99-arcade-serial.rules is common.

A rule consists of conditions followed by assignments. Match operators such as == ask whether the event belongs to the desired device. Assignment operators set a value, while += adds another value without replacing an existing list.

Common match fields include:

  • ACTION — whether the device is being added, removed or changed;
  • SUBSYSTEM — such as tty, input, video4linux or block;
  • KERNEL — the kernel name pattern, such as ttyACM*;
  • ATTR{...} — an attribute on the current device;
  • ATTRS{...} — an attribute found while walking through a parent device; and
  • ENV{...} — a property such as ID_SERIAL produced during rule processing.

Useful assignments include SYMLINK+= for an additional friendly path, GROUP= and MODE= for access, and TAG+="systemd" when the device should participate in a systemd-managed workflow.

For example, after confirming the exact properties reported for the IOIO interface, a local rule could take this shape:

SUBSYSTEM=="tty", KERNEL=="ttyACM*", \
  ENV{ID_SERIAL}=="IOIO_Open-Source_Project_IOIO", \
  ENV{ID_USB_INTERFACE_NUM}=="00", \
  SYMLINK+="pixelcade"

The values above must be checked against udevadm info on the actual cabinet before installing the rule. A good rule uses enough properties to select exactly one intended interface without depending on its current ttyACM number. If two devices report the same serial metadata, a physical ID_PATH match may be necessary instead.

After saving a rule, reload the rules and reconnect the device:

sudo udevadm control --reload-rules
# Unplug and reconnect the device, then:
udevadm settle
ls -l /dev/pixelcade

For live diagnosis, this shows the kernel event followed by the processed udev event and its properties:

sudo udevadm monitor --kernel --udev --property

There are a few practical boundaries worth preserving. A udev rule should identify the device and establish access; it should not run a long-lived application directly with RUN+=. A systemd service is a better home for a listener such as Pixelcade. Likewise, broadly setting a serial device to world-writable mode is usually unnecessary: giving the service account membership in the appropriate group, commonly dialout, is the cleaner permission model.

Finally, identity and ownership are separate questions. udevadm tells us which device this is. Tools such as fuser or lsof tell us which process currently has it open. We needed both views to solve the Pixelcade/Sinden conflict.

The rule became simple:

Pixelcade → usb-IOIO_Open-Source_Project_IOIO-if00
Sinden    → usb-Unknown_SindenLightgun_HIDLG-if00

Java to Native Application

When testing the Java version of Pixelweb, we found that despite indicating the serial/by-id device, the ttyACM ports would still be held.

The native application provides an explicit -d option for selecting the Pixelcade device by-id. This is the style documented by the current V2 instructions for systems that also have devices such as a Sinden Lightgun.

The native listener offered a cleaner boundary:

./pixelweb \
  -d /dev/serial/by-id/usb-IOIO_Open-Source_Project_IOIO-if00 \
  -image system/retropie.png \
  -startup &

As I alluded to earlier, there was just one problem: Pixelweb would not run.

A misleading “No such file” error

The file was plainly present and executable:

ls -l /home/pi/pixelcade/pixelweb

Yet running it produced:

-bash: ./pixelweb: No such file or directory

That message does not always mean the requested file is missing. Linux also reports it when the executable requires a loader that does not exist on the system.

The installed pixelweb binary was built for the wrong architecture. The Raspberry Pi reported an aarch64 kernel, which suggested 64-bit ARM, but its Buster userspace was 32-bit armhf. A 64-bit Pixelcade binary cannot be loaded by the 32-bit userspace.

The checks that mattered were:

uname -m
dpkg --print-architecture
file /home/pi/pixelcade/pixelweb

The combination was:

Kernel:     aarch64
Userspace:  armhf
Required:   32-bit ARM executable

We replaced the incompatible listener with Pixelcade’s ARMv7 Raspberry Pi build from its official build repository. The working file identified as:

ELF 32-bit LSB executable, ARM, EABI5
interpreter /lib/ld-linux-armhf.so.3

The misleading missing-file error disappeared, and the native listener could finally be started with an explicit device.

The working startup configuration

The functional Pixelcade line in autostart.sh became:

cd /home/pi/pixelcade && \
  ./pixelweb \
  -d /dev/serial/by-id/usb-IOIO_Open-Source_Project_IOIO-if00 \
  -image system/retropie.png \
  -startup &

EmulationStation starts afterward:

emulationstation #auto

This arrangement does four useful things:

  • starts Pixelcade automatically with RetroPie;
  • uses the native listener instead of pixelweb.jar;
  • assigns Pixelcade to its exact IOIO hardware identity; and
  • allows EmulationStation to start while Pixelcade remains in the background.

The old Java line was removed so that both listeners could not start together.

We also corrected the physical USB arrangement so the Pixelcade was no longer buried behind the cascaded external hub. The Sinden remained directly connected. Stable software identities solved the numbering problem, while the cleaner physical layout reduced another source of uncertainty.

The working legacy startup logic does not assume that Pixelcade will always appear at one generic serial path. It looks for:

Proving it survived a reboot

Testing before reboot was not sufficient. The entire problem involved discovery order, so a cold start was part of the acceptance test.

After reboot, the raw numbers did in fact change. The IOIO interface became ttyACM0 and the Sinden became ttyACM1. The stable by-id paths continued to point to the correct devices.

The running Pixelcade process showed the intended command:

./pixelweb -d /dev/serial/by-id/usb-IOIO_Open-Source_Project_IOIO-if00 \
  -image system/retropie.png -startup

Port ownership also showed the desired separation:

Pixelcade pixelweb → IOIO serial device
Sinden Mono app    → Sinden serial device

We then checked the behavior that actually mattered:

  1. Pixelcade started with the cabinet.
  2. The BitPixel responded while browsing EmulationStation.
  3. System and game artwork continued to display.
  4. The Sinden software could claim its own serial interface.
  5. The two devices remained separate when ttyACM0 and ttyACM1 swapped.

That was the point at which the setup was working.

Legacy does not mean worthless

The installation began with the legacy V1 procedure because the V2 installer did not work on this cabinet. Thinking about it, I wonder if it may have had to do with the mixed 64-bit/32-bit nature of the current setup.

Preservation matters. We used a legacy installer to establish a working baseline, allowed the software to evolve, adopted the newer native listener when it solved a real limitation, selected the build that matched the actual userspace, and pinned it to the hardware identity

The Pixelcade folks keeping the legacy instructions and having an upgrade path to the newer version is awesome. To me, this is how software should be developed with their upgrade paths. I can’t express how much I appreciated this.

The warning on Pixelcade’s old page is useful. It tells new users that there is a supported path they should use instead. It also tells owners of existing installations that the assumptions behind their systems are aging and deserve attention.

The BitPixel now behaves like part of the cabinet. It starts automatically, follows the front end, displays its artwork, and leaves the Sinden alone.

This is, yet, another reason why I believe in preservation, archiving old releases and making those releases available for reuse. Two examples stand out as part of this project – RGB Commander which I found via the Internet Wayback Machine, and now Pixelcade.

Retropie Console – Teaching an Arcade Panel to Explain Itself with RGB Lighting

When I created the arcade cabinet, I wanted light up buttons because I knew I wanted the lighting configuration to change with each platform being played.

I found RGBCommander online, which was deprecated and unsupported, meanwhile it worked on my console when I figured it out. During this process, I found another tool, LED Spicer, that I’m not going to use because I’m too far invested with RGBCommander, but if I ever upgrade the OS behind my RetroPie setup, I may consider switching.

RGBCommander has been great, I love it, but it’s also not the easiest to setup. The main configuration file is an XML file that contains thousands of lines for multiple systems, game-specific lighting, folder-level for multi-disc/disk games, etc. It can get mind boggling, and if you edit the file once, add a system and come back again, it can be painful to remember how the file works to then execute.

The panel we started with

The cabinet uses an Ultimarc I-PAC Ultimate I/O as its combined input and lighting interface. The control panel includes:

  • two illuminated joysticks;
  • eight RGB action buttons for each player;
  • separate Coin and Start buttons for each player;
  • a centrally mounted RGB trackball;
  • centre utility buttons labelled Exit, Mode, Menu, and Play; and
  • an additional illuminated Coin Insert output.

Each RGB control consumes three LED channels—red, green, and blue. The Ultimate I/O provides enough channels to address the panel controls individually, while RGB Commander changes their colours in response to EmulationStation system and game events.

The authoritative configuration is rgbcmdd.xml, installed on the cabinet at:

/usr/sbin/rgbcommander/rgbcmdd.xml

I have so many backups of this file it isn’t funny. That XML file is much more than a list of colours. It records the relationship between logical controls, physical positions, Ultimate I/O output pins, emulator processes, system profiles, and—in some cases—individual games.

First, understand what the button names really mean

The first trap was the model assuming that the numbered button names followed the panel from left to right. They do not, I had wired them up like this, one set for Player 1, the other for Player 2:

               TOP ROW
┌────────┬────────┬────────┬────────┐
│BUTTON2 │BUTTON4 │BUTTON6 │BUTTON8 │
├────────┼────────┼────────┼────────┤
│BUTTON1 │BUTTON3 │BUTTON5 │BUTTON7 │
└────────┴────────┴────────┴────────┘
              BOTTOM ROW

Odd-numbered buttons are on the bottom row. Even-numbered buttons are on the top row.

That means this apparently straightforward profile:

<control name="P1_BUTTON1" colour="Red"/>
<control name="P1_BUTTON2" colour="Blue"/>
<control name="P1_BUTTON3" colour="Green"/>
<control name="P1_BUTTON4" colour="Yellow"/>


appears physically as:
Top:     Blue   Yellow
Bottom:  Red    Green

This distinction became the foundation for every console profile. A colour list that looks correct in logical button order can be visibly wrong on the real panel.

We found that photographs were indispensable. An early PlayStation layout looked plausible in the XML but revealed the wrong physical placement when illuminated. A later ColecoVision calibration used deliberately distinct colours in each position, making the odd/even arrangement impossible to misread. Once one profile proved the physical map, we could apply the same understanding to both players and every other system.

I used photos, passed into the agent, so it could map the buttons, to the XML definition, to create confidence and build an understanding of how the physical world worked. This blew me away.

Player 2 had a wiring surprise

Player 1 uses the expected RGB channel order. Its joystick occupies pins 1, 2, and 3; Coin uses 4, 5, and 6; Start uses 7, 8, and 9; and the action buttons continue through pins 10 to 33.

The right side of the board is different. Player 2 is wired in BGR order, so its pin triplets are deliberately listed in reverse:

<control name="P2_BUTTON1" pin="75,74,73"/>
<control name="P2_BUTTON2" pin="78,77,76"/>

The same compensation applies to the other Player 2 buttons, joystick, Coin, and Start controls.

At first glance, descending pin numbers look like a configuration error waiting to be tidied up. In reality, they are the correction. Changing them to ascending order would swap red and blue on the entire Player 2 side.

While I knew this as I spent the time wiring up each button, the model behind the agent didn’t, so it had to learn the setup. It discovered this on its own as I provided images and it analyzed the XML.

The trackball introduced a smaller naming complication. Its real hardware name is TRACKBALL, connected to pins 40, 41, and 42. Older profiles also contain P1_TRACKBALL and P2_TRACKBALL aliases. Those aliases are useful for compatibility, but neither one is a substitute for the physical TRACKBALL entry. Removing the middle name would leave the actual illuminated trackball out of the profile.

Recreating familiar controllers on an arcade layout

The most recognizable profiles borrow the visual language of the original controller.

The PlayStation layout uses violet, lime, cyan, and red in the physical positions corresponding to Triangle, Circle, Cross, and Square. The first calibration exposed a placement error when I was programming the XML file manually; the corrected version now appears consistently on both player sides. PSP uses the same face-button arrangement but illuminates Player 1 only, reflecting the handheld’s single-player nature.

The SNES profile uses the familiar green, blue, yellow, and red Super Famicom/PAL palette. Dreamcast uses blue, yellow, green, and red, with subdued additional controls. Saturn uses the Japanese Model 2 pad palette: green, yellow, and blue across the primary bottom row, grey across the upper row, and a muted fourth position.

These profiles are not trying to turn the arcade buttons into perfect replicas. The shapes and spacing are different. Colour provides just enough recognition to make the translation intuitive.

Other systems benefit more from simplicity than authenticity:

  • Atari 2600 illuminates one action button.
  • Game Gear lights two bottom-row actions for Player 1, along with its Start and joystick treatment.
  • SG-1000 exposes two white action buttons for both players.
  • WonderSwan and WonderSwan Color use distinct two-button handheld palettes.
  • Vectrex presents two actions per player with matching cyan joysticks.
  • SuperGrafx illuminates only the first two bottom-row controls in red and blue.

Dark buttons are just as important as lit ones. If a system only needs two controls, six unlit buttons communicate that fact much faster than a diagram hidden in a manual.

Some profiles explain function rather than history

Not every emulated system has one canonical gamepad. Classic computers may use a joystick in one game, the keyboard in another, and a mouse in a third. Ports and Steam titles can vary even more widely.

For those collections, the lighting is intentionally practical:

  • pointer-first systems such as Macintosh, ScummVM, ResidualVM, and Z-machine illuminate the physical trackball and likely click actions;
  • two-button computer profiles illuminate the first two bottom-row actions and the joysticks;
  • the broad PC profile exposes six coloured actions per player, both joysticks, and the trackball;
  • controller-driven engines use a conventional four-colour action layout; and
  • variable collections such as Ports and Steam use broad diagnostic profiles rather than pretending that every game shares one controller.

This is an important design boundary. The panel should be honest. When the exact layout varies by game, the lights can identify the available control families without claiming more certainty than we have.

Branding can be useful too

The ZX Spectrum profile is a deliberate exception to the usual mirrored Player 1 and Player 2 treatment.

Both gameplay sides use the same red, green, yellow, and blue action arrangement, but the Coin and Start controls form the classic Spectrum colour sequence:

ControlColour
Player 1 CoinRed
Player 1 StartYellow
Player 2 CoinGreen
Player 2 StartBlue

Both joysticks remain dim.

Functionally, the two sides still behave consistently. Visually, the upper controls become a small piece of system branding. Mirroring the Player 1 colours onto Player 2 would be more symmetrical but would erase the point of the design.

System-wide profiles are not always enough

RGB Commander can select a profile from the EmulationStation system name, but some games need more specific treatment.

Arcade collections are the obvious example. MAME games can have ROM-specific button mappings, so the panel can illuminate the controls used by an individual title and fall back to the shared arcade profile when no game-specific definition exists.

SuperGrafx revealed a different version of the same problem. It has its own two-button system profile, but five SuperGrafx titles also appear as per-game emulator routes inside the PC Engine collection: 1941, Aldynes, Battle Ace, Dai Makaimura, and Madou Ou Granzort.

We added matching ROM-specific entries to the PC Engine lighting profile. Those games now receive the red-and-blue SuperGrafx layout regardless of which collection launches them, while ordinary PC Engine titles retain their normal lighting.

The lesson was that the menu folder is not always the whole story. Lighting must sometimes follow the actual game or emulator route rather than the collection label alone.

Lighting must never prevent a game from starting

RGB Commander needs to identify the process that actually runs an emulator. Most Libretro systems eventually launch retroarch. Our Amiga configurations use standalone Amiberry.

The original Amiga lighting entries could leave RGB Commander waiting for the wrong process. Repeated launches filled its message queue, and RetroPie’s start hook could block before Amiberry appeared. A feature intended to clarify the controls was now capable of stopping the game entirely.

We corrected both sides of the failure:

  1. The Amiga and Amiga CD32 profiles now identify amiberry as their emulator process.
  2. The launch hook gives RGB Commander two seconds and then continues regardless:
timeout --signal=TERM --kill-after=1s 2s \
  rgbparse "$1" "$3" > /dev/null 2>&1 || true

The first correction makes the lighting work. The second establishes the right priority: lighting is helpful, but gameplay is essential. A lighting-service failure must never strand the user outside the emulator.

We validated the correction with A500, A500+, A1200, CD32, and CDTV launches, as well as ordinary Libretro games.

Preserving RGB Commander in Dual DInput mode

The I-PAC also provides the cabinet controls. We keep it in Dual DInput mode so it exposes two independent panel gamepads rather than pretending to be a keyboard or collapsing the cabinet into one Xbox-style player.

RGB Commander 0.4.0.5 recognizes the I-PAC’s older keyboard-mode USB product ID, but not the product ID used in Dual DInput mode. Returning to keyboard mode would have fixed the lights by breaking the input design.

Instead, we created a narrowly scoped compatibility library that is preloaded only into the RGB Commander service. For the Dual DInput device, it changes the product ID reported to that one process. It does not change the real USB descriptor, firmware, input events, or LED protocol, and no other application sees the substitution.

This lets the input and lighting systems remain independent. The virtual gamepad merger handles gameplay controls, while RGB Commander continues to address the physical Ultimate I/O directly.

Our editing and test routine

A lighting change is not complete when the XML looks right. Our normal process is:

  1. Confirm the physical row and logical button number.
  2. Define both players for a two-player system, or intentionally limit a handheld to Player 1.
  3. Preserve Player 2’s reversed BGR pin order.
  4. Decide explicitly whether unused controls should be dim or fully off.
  5. Preserve the real TRACKBALL output when compatibility aliases are present.
  6. Validate the XML before installation.
  7. Back up the live configuration.
  8. Restart RGB Commander and inspect its service log.
  9. Launch a Libretro game and a standalone Amiberry game.
  10. Compare the illuminated panel with the intended physical layout—preferably with a photograph.

The XML is validated before installation with:

xmllint --noout rgbcmdd.xml

After installation, RGB Commander should be active and the emulator launch should never pause waiting for it.

We keep the live XML, a copy beside the full-drive backup, and a working copy on another computer. The file is small, but it represents hours of physical tracing, calibration, system research, and design decisions. Losing it would be more like losing part of the wiring diagram than losing a cosmetic preference.

The result

In the front end, the cabinet can still be playful. The Player 1 joystick is associated with red, Player 2 with blue, and the joystick lighting animates while the buttons display different colours ready for action.

Launch a game and the purpose changes. A one-button system becomes visually simple. A PlayStation game presents a familiar four-colour arrangement. A pointer-oriented computer brings the trackball into focus. A two-player system mirrors the useful controls across both sides. Unused buttons disappear.

The panel no longer asks a new player to understand eight identical glowing buttons. It offers a suggestion and provides guidance before the game even starts.

That is the difference between lighting a control panel and teaching it to explain itself.

Retropie Console – Scraping in the new world, when scrapers fail you

I am an advocate for gaming history and archiving – both retro and modern. I love the fact we have places like archive.org for preserving BIOS and ROM sets for many systems and consoles.

Artwork is also incredibly important. There are a number of good sources: ScreenScraper is one I have supported and used for a long time, and there are also data and artwork collections at places such as Lemon64 and LaunchBox.

Sometimes collecting the metadata is easy. The scraper software in RetroPie is good: it connects us to these services and helps match the games in a library. But what happens when filenames contain all the extra characters and classification tags commonly found in archives such as TOSEC? What happens when several releases have almost the same name, or when a technically successful match is simply the wrong game?

We are living through exciting, interesting, and exceptional times in computing, especially with the advent of artificial intelligence, the rise of large language models, and agents such as Codex.

I can hear your eyeroll – please stick with me and hear me out on this one.

My thoughts on AI generally

I have been heavily involved in the AI space for the past two years. I have participated in the development of LLM-based solutions, I have a good grasp of how to use an LLM as a tool, and I recognize the importance of keeping a human in the loop.

I have enough experience with prompt engineering to direct an agent toward what I want, recognize when it has misunderstood me, and steer the work back on course. Understanding the limitations is just as important as understanding the capabilities. I firmly believe that people who develop real experience with AI will be better placed to succeed in the future.

The difference between the amount of work I can complete in a day with and without an LLM is astounding.

I will write more about my thoughts on AI, and I have several related ideas percolating for my YouTube channel. I understand the fears—very much so. I also shake my head when I see these tools being used carelessly, or judged only by the results of using them carelessly.

I use LLMs and agents as a way to improve my own knowledge and capabilities:

  • I have learned games development at a deeper level for the Playdate and Adafruit MacroPad platforms
  • I use LLMs to help refine emails and make them sound more professional. I never simply use the generated text verbatim; I merge useful ideas into my own version.
  • I have been learning to manage Linux more effectively through work on my homelab and this arcade cabinet.
  • I have used agents to help debug difficult issues, especially by analyzing logs that might otherwise have taken me hours to correlate—for example, determining the exact cause of a Windows 11 blue screen.

This RetroPie metadata project is another example, but it goes beyond asking a chatbot a question or requesting a short script. All of the supporting code was developed through agentic work under my direction.

What “written using AI” means in this project

I described the problem, the behavior I wanted, and the risks I was unwilling to accept. The agent helped inspect the existing cabinet, wrote the tools, ran read-only analyses, interpreted the resulting reports, and refined the implementation as we encountered real-world edge cases.

I actually thought this was risky – giving the agent access to my fully curated 3.6Tb image to clean up scraping. I had full backups – two digital copies and a copy of my SDD on a hard drive, so I was prepared to fail. After all, you learn by failing and I’ve learned to fully embrace that.

My direction established the important rules:

  • inspect the current library before changing it;
  • preserve good work that already exists locally;
  • never treat a fuzzy match as a fact;
  • keep scraper access and credentials separate from the maintenance toolkit;
  • make the default behavior read-only;
  • require an explicit command before modifying anything;
  • back up a gamelist before replacing it; and
  • produce reports that a person can inspect at every stage.

The agent turned those requirements into a collection of working Python tools behind a single retropie-metadata command. It was developed iteratively: run an audit, examine what the real collection revealed, adjust the logic, and test again. The code was generated agentically, but the objective, constraints, acceptance decisions, and definition of “correct” remained mine.

That distinction matters. I did not ask an AI to decide what every game was and then blindly rewrite the cabinet. I used an agent to help build a system that makes ambiguity visible and gives me control over the decision.

In other words, the coding agent is handled much like the scraper itself: extremely capable, very useful, and always subject to verification.

Back to scraping

A well-organized RetroPie library looks effortless. Every title has the right name, description, artwork, and launch path. Browse the menu and everything appears to belong exactly where it is. That has been my dream with this project.

Maintaining that illusion is harder than creating it. LOL

Our arcade cabinet contains dozens of console, computer, handheld, arcade, and specialist systems. Over time, games move, filenames change, emulator collections are reorganized, and metadata comes from several generations of tools. A missing screenshot is easy to notice. A plausible-looking but incorrect match is much more dangerous.

The obvious answer is to run a scraper again. I deliberately chose a different approach.

Rather than allowing a scraper to rewrite the library, we treat it as an untrusted source of suggestions. The cabinet is audited first, existing local work is recovered wherever possible, external results are staged and scored, and only reviewed matches are allowed into a gamelist.

The result is slower than clicking “scrape everything”, but vastly easier to understand, verify, and repair.

Why a successful scrape can still be wrong

A scraper is good at finding likely matches. It cannot always know what a file means in a particular collection.

Several situations can produce a confident but incorrect result:

  • regional releases with similar names;
  • translated, hacked, prototype, or alternate versions;
  • disc and cartridge editions of the same game;
  • titles with punctuation, subtitles, or filename tags;
  • computer software whose filename describes the media rather than the game;
  • MAME short names that require a separate name map; and
  • custom launch entries that look like games but actually invoke a script or mounted image.

A bad match is not necessarily obvious. The title may look reasonable and the artwork may even be from the same series. Once that result is written into gamelist.xml, it becomes difficult to remember which fields were carefully curated and which ones came from an automated guess.

There is also more to library health than missing artwork. A gamelist can contain a beautiful entry whose ROM path no longer exists. The filesystem can contain media that no game references. Two copies of a gamelist can disagree. A scraper cache can hold useful data that was never merged—or stale data that should never be merged.

We needed a process that could distinguish all of those conditions.

Our rule: audit before acquisition

The metadata workflow is coordinated by a cabinet tool called retropie-metadata. It does not contact ScreenScraper, store scraper credentials, or download media. Its job is to understand the local library and control what happens to external results.

The first step is verification:

cd /home/pi/mame-organizer/toolkit
./retropie-metadata verify
--output work/verification.json

This checks every known copy of each system’s gamelist.xml and verifies the files referenced by those lists. We want to know whether the current library is internally consistent before introducing any new data.

Next, we identify what is actually missing.

./retropie-metadata audit
--output-tsv work/missing.tsv
--output-summary work/missing-summary.json

The detailed TSV is intended for inspection and filtering. The JSON summary gives us a compact view of the scope. Separating those outputs is useful: the summary tells us whether we have a small repair or a collection-wide problem, while the tabular report tells us which individual entries require attention.

At this stage nothing has changed. That is an important feature, not an incomplete operation.

Recover local work before downloading replacements

Old gamelists, scraper caches, and media directories often contain perfectly usable information. A game that is missing a description in the active list may already have one in another trustworthy local source. Artwork may exist on disk under an older path. Reusing that work is safer than asking a remote service to identify the game again.

We search for recoverable local material.

This produces a recovery audit rather than silently inserting the results. We inspect the proposed sources, confirm that they refer to the same games, and only then repeat the operation with --apply.

That order gives local evidence priority:

  1. Preserve correct metadata that has already been curated.
  2. Reconnect media that already exists.
  3. Resolve stale paths where the intended target is clear.
  4. Send only the genuinely unresolved entries to the external scraping stage.

It also avoids unnecessary downloads and reduces the number of ambiguous matches that need human attention later.

Treat external scraping as an import operation

Once local recovery is complete, the unresolved report becomes the input to a preparation step:

./retropie-metadata prepare-scrape
--missing work/missing.tsv
--review work/local-recovery/local-recovery-audit.csv
--output-dir work/scraper-staging

Preparation creates normalized titles, mappings, and target lists. It still does not contact the network. The point is to make the request explicit before another tool sees it.

This is where known naming exceptions belong. The cabinet’s Skyscraper configuration preserves title aliases, platform corrections, MAME mappings, matching hints, targeted inclusion lists, and records of deliberately skipped items. Those files explain the collection’s intent in a repeatable form.

Aliases and hints are better than manually correcting the same title after every future scrape. They turn one-off knowledge into part of the maintenance system.

The external scraper operates outside our metadata tool. Its returned cache is imported or placed under the staging directory. We then analyze the results without merging them:

./retropie-metadata review-scrape
--staging work/scraper-staging
--output-dir work/scraper-review

The review stage scores candidate matches and produces material for human inspection. A score helps prioritize the work, but it is not permission to modify the library. We still review the normalized name, platform, proposed match, and any ambiguity before approval.

If the results look wrong, the response is not to accept them and clean up afterward. We stop, improve the aliases or hints, and repeat preparation and review.

Merge approved results, and nothing else.

Approved candidates are passed to the merge stage:

./retropie-metadata merge-scrape
--staging work/scraper-staging
--review-dir work/scraper-review
--output-dir work/scraper-merge

Even this is a dry run. The generated merge can be inspected before it reaches an active gamelist. Only after the approved output is correct do we add --apply.

All modifying operations require an explicit --apply or --execute. Gamelist updates are written atomically and receive timestamped backups. A partial write should never be able to leave the front end with half a valid XML file, and a newly discovered problem should have a clear rollback point.

We also exit EmulationStation before applying changes. The front end reads and may write its own metadata, so editing the same gamelists while it is running creates an avoidable ownership conflict.

The operating rule is simple:

Generation is automatic. Acceptance is deliberate.

Audit the media as well as the XML

A cleanly parsed gamelist.xml does not prove that the library is clean. The final audit includes the media directories:

./retropie-metadata audit-media
--output-dir work/media-audit

This lets us separate several different states that are often collapsed into “missing artwork”:

  • missing: the gamelist expects media that is not present;
  • reusable: suitable media already exists locally but is not connected to the entry;
  • orphaned: a media file exists but no gamelist entry references it; and
  • uncatalogued: content exists outside the expected catalogue relationship and needs review.

Those categories lead to different actions. A missing image may need to be sourced. A reusable image needs a corrected reference. An orphan may be left over from a renamed game, or it may be the only surviving copy of wanted artwork. Automatically deleting every orphan would throw away evidence before we understood it.

Stale game paths receive their own analysis:

./retropie-metadata analyze-stale
--verification work/verification.json
--output-tsv work/stale.tsv
--output-summary work/stale.json

This is especially valuable after reorganizing a ROM collection. Metadata should follow intentional moves, but an unresolved path should remain visible rather than being guessed into a similarly named file.

Verify again before declaring success

After approved changes are applied, we run the verification step again. The second pass should demonstrate that:

  • the gamelists still parse correctly;
  • referenced games and media exist;
  • the intended missing fields were filled;
  • no unrelated entries were replaced;
  • repaired paths point to the correct files; and
  • the remaining exceptions are understood and documented.

Only then do we restart EmulationStation and inspect the results in the interface.

This gives the process a useful shape:

verify
  ↓
audit what is missing
  ↓
recover trustworthy local data
  ↓
prepare unresolved targets
  ↓
scrape into staging
  ↓
score and review candidates
  ↓
preview the approved merge
  ↓
apply
  ↓
verify again

Every arrow leaves behind a report. If something unexpected appears at the end, we can trace where it entered the process instead of trying to reconstruct a single opaque scraper run.

Why we do not start over with a clean cache

When scraper results become confusing, deleting the cache and starting again is tempting. For a large library, that is an expensive and sometimes destructive reflex.

A cache may contain years of valid results, hand-resolved titles, and media that is no longer easy to retrieve. Rebuilding it also does not correct a bad alias, an incorrect platform, or an ambiguous filename. Without fixing the underlying interpretation, a clean scrape may simply reproduce the same mistake at a larger scale.

We preserve the existing cache and review reports when making targeted corrections. A clean-slate scrape is considered only when it is genuinely necessary, and its completion is verified before it is allowed to generate a replacement gamelist.

What changed for us

The biggest improvement was not better artwork. It was confidence.

We can now answer questions that a one-click workflow obscures:

  • Which entries were incomplete before the run?
  • Which fields came from existing local data?
  • Which games were sent to the external scraper?
  • What match did the scraper propose?
  • Why was that match approved?
  • Which files changed when the merge was applied?
  • Does the final gamelist still point to real games and media?

The scraper remains useful. It is simply no longer trusted with the final decision.

The same principle applies to the AI agent that helped me build the toolkit. Agentic development made it possible to inspect a large, messy collection and create a purpose-built set of tools in a fraction of the time it would otherwise have taken me. That speed did not remove the need for judgment. It made good guardrails even more important.

Human-in-the-loop cannot mean clicking “yes” at the end of a process nobody understands. In this project it means setting the rules, examining intermediate evidence, challenging suspicious output, refining the implementation, and deciding what is allowed to become part of the live collection.

That distinction scales well beyond RetroPie. Any automated system—whether it is matching a game or writing the code that performs the match—can produce a convincing mistake. The safest workflow separates discovery from authority: let automation find possibilities, preserve the evidence, test what it produces, and require an explicit review before those possibilities become reality.

For our cabinet, that combination of agentic development and human control turned metadata maintenance from a risky rewrite into a controlled, repeatable repair process. It is also a practical example of why I am optimistic about AI: not because it replaces expertise, curiosity, or responsibility, but because it can amplify all three when it is directed thoughtfully.

I was very surprised at how effective using an agent was for this process. The fact it was able to identify and pull box artwork rather than, say, a marquee – which was a problem I had during my initial scraping attempts.

Despite what I said earlier about “The result is slower than clicking scrape everything”, I think this process actually ended up being faster. Why? I’m not repeatedly running a scraper constantly against Screenscraper.fr and hoping for the best; when even the scraper fails, I could then ask the agent to search other databases to find the correct art and details and it did perfectly because it had clear data to act on.

All under my control and guidance, with a human in the loop.

I plan on making the tools available on Github as an example that someone could augment and update.

Retropie Console – Game Controller Setup

3 years ago I wrote a blog entry that covers how I setup a bunch of arcade buttons and two joysticks attached to an Ultimarc I-Pac board.

With doing a big final push to get every emulator and control working, I realized that keyboard mode would not work for the arcade panel. What do I do? When I tried Xbox mode, it saw the controller as a single set of controls rather than two separate set.

I missed using the Dual DInput mode! Setting that mode, and reprogramming the buttons, everything worked as I needed it to!

Also, I can use either a wireless controller as player 1 and player 2, and switch to the arcade panel too. It does mean that everything is setup for two player rather than up to four players (Gauntlet, anyone)? It’s something I’ll have to figure out in the future, but for now it works for a wide range of game seamlessly, which is what I always wanted.

The “virtual connector” setup is a small Linux evdev/uinput merger. It keeps two always-named virtual players while accepting either the matching panel controls or wireless controller. 

Lets get into the details:

One of the deceptively difficult parts of building an arcade cabinet is not connecting the controls. It is making those controls appear consistently to every emulator, every time the cabinet starts.

Our control panel uses an Ultimarc I-PAC Ultimate I/O, with two 8BitDo wireless controllers available for games that are better suited to a conventional gamepad. The goal sounded simple:

  • the left side of the panel and the first wireless controller should both operate Player 1;
  • the right side of the panel and the second wireless controller should both operate Player 2; and
  • games should see the same two controllers regardless of USB detection order or whether the wireless controllers are powered on.

Getting there required more than a set of RetroArch mappings. We put the I-PAC into Dual DInput mode, normalized the panel’s raw inputs, and built a small virtual-controller service that combines the physical devices into two stable players.

Why we chose Dual DInput mode

The I-PAC Ultimate I/O can present its controls to the computer in different ways. Keyboard mode is convenient for a simple MAME cabinet, but this machine also runs emulated home computers. Those systems need a real keyboard, and having the arcade panel generate keyboard presses creates conflicts that are difficult to reason about.

Xbox mode avoided the keyboard problem, but it exposed the panel as only one player. That did not satisfy the basic requirement of a two-player cabinet.

Dual DInput mode was the right fit. In this mode, the I-PAC identifies as USB device d209:0412 and exposes two independent Linux gamepads—one for each side of the control panel. It gives the cabinet a clean separation between the physical keyboard and the arcade controls, while preserving both panel players.

After switching modes, we tested the raw events instead of assuming that the labels on the panel matched the resulting button numbers. That uncovered an important asymmetry:

Physical controlRaw Player 1 inputRaw Player 2 input
Action buttons 1–6Buttons 0–5Buttons 0–5
StartButton 6Button 7
CoinButton 7Button 6
Centre utility buttonButton 10Button 10

Player 1 and Player 2 report Coin and Start in the opposite order. This is not a problem once it is known, but it is exactly the sort of detail that produces baffling emulator mappings if it is left uncorrected.

It was decided that the raw I-PAC layout should never leak into the emulator configuration. Both sides would be translated to one common logical layout first.

Why ordinary controller indices were not enough

Dual DInput gave us two panel gamepads. Turning on both 8BitDo controllers added two more. Linux and RetroArch could therefore see as many as four physical gamepads:

I-PAC Player 1
I-PAC Player 2
8BitDo controller 1
8BitDo controller 2

The numeric order of those devices was not dependable. It could change with USB discovery order, controller power state, or the mode selected on a wireless controller. A fixed configuration such as “Player 1 uses controller index 0” might work after one boot and select a different device after the next.

There was a second usability issue. We did not want players to choose between a panel profile and a wireless profile before starting a game. The panel and the assigned controller are alternate ways to control the same player. The emulator should not need to know which one is being used.

The solution was to move that decision below RetroArch.

The virtual-controller merger

We wrote a small Python service called arcade-gamepad-merger. It reads Linux input events using python3-evdev and creates two new gamepads through /dev/uinput:

I-PAC P1 ─────────┐
                  ├── Arcade Merged Player 1
first 8BitDo ─────┘

I-PAC P2 ─────────┐
                  ├── Arcade Merged Player 2
second 8BitDo ────┘

RetroArch sees only the stable logical destination it cares about. Pressing left on the Player 1 panel joystick or on the first 8BitDo produces left on Arcade Merged Player 1. The same arrangement applies to Player 2.

The service does not take exclusive ownership of the physical devices. That is deliberate. EmulationStation can still see them, diagnostic tools can still inspect them, and RGB Commander can continue talking directly to the I-PAC lighting hardware.

The merger performs several useful translations along the way:

  • it converts the panel’s physical button order to our preferred RetroPad B/A/Y/X layout;
  • it corrects the reversed Coin and Start inputs on the two I-PAC interfaces;
  • it maps Coin to virtual button 10 and Start to virtual button 11 for both players;
  • it maps the centre utility inputs to virtual button 12 for hotkey enable and Game Focus;
  • it combines simultaneous sources safely, so releasing a button on one device does not cancel the same button while it is still held on the other; and
  • it releases the state belonging to a disconnected source without recreating both virtual controllers.

That last point matters. If a wireless controller goes to sleep during a session, the virtual devices remain present. A running emulator does not suddenly lose and rediscover its Player 1 and Player 2 devices.

The service starts at boot, depends on /dev/uinput, and is supervised by systemd. If it fails unexpectedly, it is restarted automatically.

Handling two modes of the same wireless controller

Our two wireless controllers are physically the same 8BitDo model, but they did not end up using the same operating mode.

The normal arrangement is:

AssignmentModeUSB identityPurpose
First 8BitDoD mode2dc8:3013Wireless source for Player 1
Second 8BitDoX mode2dc8:3106Wireless source for Player 2

We originally expected both to remain in D mode. In practice, the second controller’s receiver repeatedly fell back to USB product 2dc8:3109 with the name 8BitDo IDLE. We ruled out USB autosuspend, hub faults, low-voltage warnings, and EmulationStation mappings. The receiver was genuinely losing its active D-mode link.

X mode remained stable, so we taught the merger to understand both formats. DInput reports stick positions in a 0…255 range, while XInput uses signed values from -32768…32767. The merger scales the XInput axes into the common virtual range. It also converts XInput’s analogue trigger axes into the digital L2 and R2 buttons expected by our shared RetroArch profile.

This lets two differently configured physical controllers produce exactly the same logical control layout.

Giving RetroArch stable names and explicit mappings

Creating the virtual devices solved the unstable hardware order, but there was one more RetroArch detail to handle.

RetroPie’s controller-selection file is configured to resolve the two virtual controllers by name whenever a Libretro game starts:

joystick_selection_by_name = "true"
input_player1_joypad_index = "Arcade Merged Player 1 #1"
input_player2_joypad_index = "Arcade Merged Player 2 #1"

Name-based selection is much safer than storing numeric indices. However, changing input_playerN_joypad_index does not automatically copy that device’s autoconfiguration into the selected player port. We therefore kept explicit Player 1 and Player 2 button and axis bindings in the global RetroArch configuration, and installed matching autoconfiguration profiles for both virtual devices.

The normalized layout is:

FunctionVirtual input
Face buttonsButtons 0, 1, 3 and 4
L/RButtons 6 and 7
L2/R2Buttons 8 and 9
Select/CoinButton 10
StartButton 11
Hotkey Enable / Game FocusButton 12
L3/R3Buttons 13 and 14
D-padHat 0
Left stickAxes 0 and 1
Right stickAxes 2 and 3

For MAME, the old arrangement referred to four joystick numbers and included extra stick-click fallbacks for Coin and Start. Once the merged devices were working, we simplified MAME to use Joy 1 and Joy 2 only. Its global Start inputs also needed to be the proper START1 and START2 types.

Keeping the button lighting working

Dual DInput created one unrelated compatibility wrinkle. RGB Commander 0.4.0.5 recognized the I-PAC’s keyboard-mode USB product, d209:0410, but not its Dual DInput identity, d209:0412.

Changing the I-PAC back to keyboard mode just to satisfy the lighting program would have undone the whole input design. Instead, we added a tightly scoped compatibility library that is preloaded only into the RGB Commander service:

[Service]
Environment=LD_PRELOAD=/usr/sbin/rgbcommander/compat/libipac-rgbcommander-compat.so

For the d209:0412 device, the shim changes only the product ID reported to RGB Commander. It does not modify the real USB descriptor, firmware, input events, or LED protocol, and it has no effect on any other process. The controls remain genuine Dual DInput devices while the existing lighting software continues to recognize the board.

The input merger and the RGB compatibility layer are intentionally separate. One normalizes gameplay controls; the other preserves lighting support.

Testing the complete path

We tested at each layer rather than jumping straight into a game:

  1. Confirm the I-PAC appears as two event devices in Dual DInput mode.
  2. Inspect raw events to record the actual button and hat codes for both sides.
  3. Confirm the merger service creates Arcade Merged Player 1 and Arcade Merged Player 2.
  4. Use evtest on each merged device and verify that both of its physical sources produce the expected events.
  5. Restart the cabinet and confirm that RetroPie resolves the virtual controllers by name.
  6. Test different Libretro cores rather than assuming one successful emulator proves the whole configuration.

The final post-reboot test covered lr-MAME, lr-FBNeo, lr-snes9x, and lr-VICE. We also used Bubble Bobble to verify that the X-mode controller was correctly translated and routed to Player 2.

The result

The finished system presents two dependable controllers to games:

  • Player 1 can use either the left side of the cabinet or the first 8BitDo.
  • Player 2 can use either the right side of the cabinet or the second 8BitDo.
  • Coin, Start, action buttons, sticks, triggers, and hotkeys have the same logical meaning regardless of their physical source.
  • Wireless sleep or reconnection does not renumber the virtual players.
  • Computer emulators retain a genuine keyboard.
  • The I-PAC’s RGB lighting continues to work in Dual DInput mode.

The broader lesson was that controller mapping is easiest to maintain when hardware quirks are normalized in one place. Instead of teaching every emulator about four physical devices, two I-PAC layouts, and two wireless protocols, we created one stable boundary: Arcade Merged Player 1 and Arcade Merged Player 2.

Everything above that boundary is now pleasantly boring—which is exactly what we wanted.

Changes coming for my YouTube Channel

In 2019, I started creating content on YouTube documenting my year of living in the UK and spending time in mainland Europe.

The pandemic hit and I’ve not been travelling as much, so I decided to start some tech content.

While I’m not travelling as much, I think it’s going to be important to split my content into three different channels:

That way you get to see and subscribe to the content you want to follow, and that will also likely help “the algorithm” direct people to the correct content.

For the next few months, I’ll be transitioning content to their respective channels posting videos weekly

Iain in Halifax YHZ

RetroPie, Ultimarc I-Pac Ultimate I/O Game Console, RGB Commander and xboxdrv

About two years ago, I was inspired by my partner Sté to put together my own arcade game console with buttons, two joysticks, blinky LEDS and make it Raspberry Pi and RetroPie-based.

It was a great project to start during the COVID-19 Pandemic, but I ran into an issue when one of the vendors sent me the wrong cables. I finally got around to sorting this out and got the controller up and running.

I’m putting this together so that anyone who wants to do something similar with RetoPie can do so. There were some hoops I had to jump through to get this working, mainly around drivers that were no longer available, but re-found courtesy of the Internet Archives.

Here is where I picked up the parts:

  • Game Room Solutions – Who designed the console box and artwork
  • Ultimarc – I went with the Classic RGB Illuminated buttons and went with the I-Pac Ultimate I/O which acts as a keyboard, Xbox 360 Controller, or dInput. I also wanted illuminated joysticks.
  • Raspberry Pi 4 – The guts of the system – 4gb spec.
  • Crucial X8 4Tb SSD – I wanted something fast, relatively low power, and efficient for space. I also have curated a significantly large image of games from the 70s to early 2000s. Previously I was using a WD 4Tb My Passport which does the trick and thankfully I was able to copy the image to the SDD.
  • Atolla USB Hub – While it seems I can power the SDD from the Raspberry Pi directly, I wanted to make sure I had a powered USB hub to help with power.
  • Various cables
    1. USB A-USB C cable for power to the Raspberry Pi from the USB hub
    2. Power cable for the Ultimate I/O board to power LEDs
    3. Micro USB-USB A for the Ultimate I/O board for cotrol
    4. Micro HDMI to HDMI and with a female to female converter to hook up to my TV
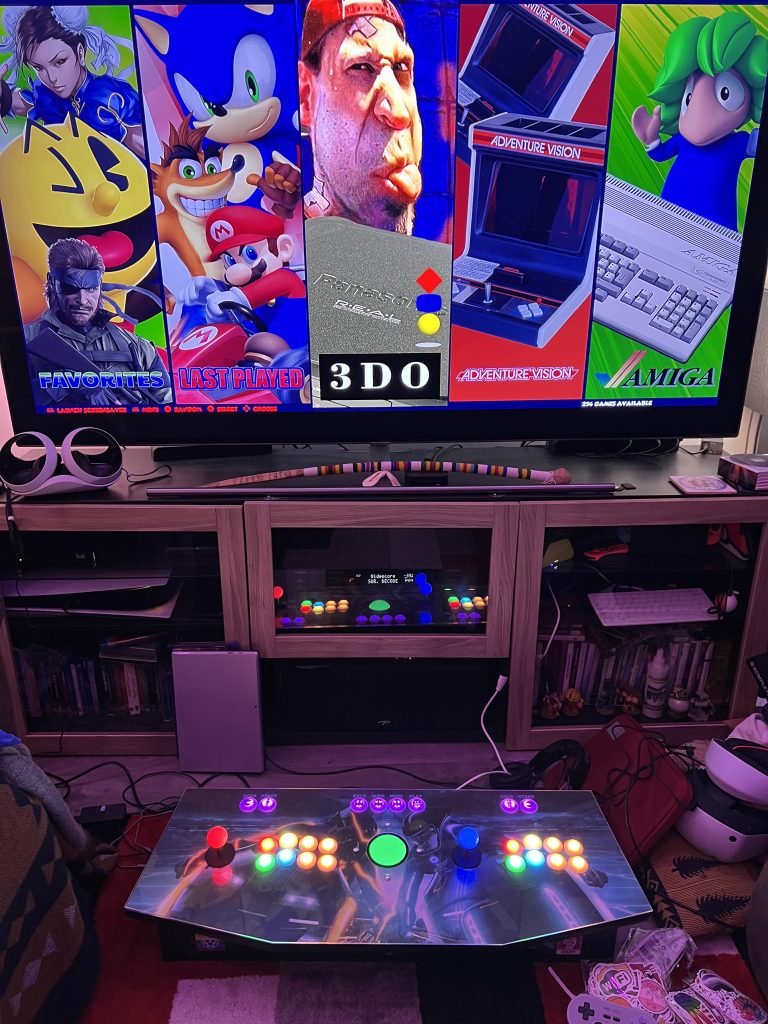
A lesson learned

I originally bought a set of buttons and a controller from Amazon or Aliexpress, and while it sort of worked, I ran into an issue with keyboard emulation. From what I recall, I couldn’t use two of these controllers at the same time for the two different sides, or something else. It’s been a while. I know I also had some issues with powering the LEDs on those buttons.

I was also frustrated because the buttons were really brittle so taking off the switches broke the harness that the switch sits in.

Setting it up

When ordering the Ultimate I/O board make sure you go with the 4.8 mm switch connector. The buttons had 4.8 mm connectors, not the 2.8 mm which are for the Goldleaf connectors. I had ordered the 4.8 mm harness with mine, and Ultimarc sent me the 4.8 mm and 2.8 mm version.

Wiring is not too hard, but a few tips:

  • Make a note of where you’re connecting your LEDs for the buttons as you’ll need the port numbers for programming/configuration later
  • Pay attention to the switch harness and what wire goes to which button as they are specific
  • Buttons for Joysticks and Buttons themselves often have two connectors – for the signal wire. I found that you want to connect the signal wire to the terminal closest to the ground. Otherwise it assumes the switch is closed when you’re not pressing the button rather than open:
Keyboard or Xbox 360 Mode?

The Ultimarc I/O board can switch between multiple modes – Keyboard, dInput, and Xbox 360 mode. I didn’t explore much with dInput mode as I’ve had good experiences with both Keyboards and Xbox controllers with RetroPie.

There is once big caveat – If you use Xbox mode, you cannot control the LEDs on the board. As I understand it, Microsoft locks down the abilities of boards that emulate Xbox controllers in their protocols, and so you cannot control the LEDs.

That said, two controllers are clearly visible in Xbox mode and it works well. Just be sure to program the triggers to the proper Coin and Start buttons if you use this mode. If you’re not using LEDs, this could work for you.

Now, what is the challenge if you use Keyboard mode with RetroPie? Well…out of the box, you can only setup the keyboard as a single player device, you can’t have two distinct set of controllers and control them as Player 1 and 2 separately.

If you try to setup both sides, you end up wiping out the controls for the other player. So if I setup Player 1 and then setup Player 2, I end up wiping out the Player 2 controls.

Attempt #1: xboxdrv

Update 2023-08-31: I thought xboxdrv to the rescue, but it actually didn’t work. Sure enough, it turned my keyboard into an Xbox controller, but only one controller, not two.

So you can’t say one part of the keyboard is player 1, and another part is player 2. ARGH!

Here is what I had previously written:

xboxdrv allows you to setup a single keyboard-like device as two controllers (nope!). So your device still acts like a keyboard, and the driver converts the keypresses as if it were an Xbox controller. Perfect for what I needed so I can control the LEDs and have two controllers.

The RetroPie documentation is great is covered what I needed, as is the manpage for xboxdrv.

Ultimately what got me over the hurdle was the –next-controller command. Here is the command line I ended up using for the base configuration of my Ultimate I/O:

sudo /opt/retropie/supplementary/xboxdrv/bin/xboxdrv \
    --evdev /dev/input/by-id/usb-Ultimarc_I-PAC_Ultimate_I_O_4-event-kbd \
    --silent \
    --detach-kernel-driver \
    --force-feedback \
    --deadzone-trigger 15% \
    --deadzone 4000 \
    --mimic-xpad \
    --dpad-as-button \
    --evdev-keymap KEY_LEFTCTRL=a,KEY_LEFTALT=b,KEY_SPACE=x,KEY_LEFTSHIFT=y,KEY_Z=lb,KEY_X=rb,KEY_C=tl,KEY_V=tr,KEY_3=guide,KEY_1=back,KEY_5=start,KEY_UP=du,KEY_DOWN=dd,KEY_LEFT=dl,KEY_RIGHT=dr \
--ui-axismap lt=void,rt=void,x1=void,x2=void,y1=void,y2=void \
  --next-controller \
    --evdev-keymap KEY_A=a,KEY_S=b,KEY_Q=x,KEY_W=y,KEY_I=lb,KEY_K=rb,KEY_J=tl,KEY_L=tr,KEY_8=guide,KEY_6=back,KEY_2=start,KEY_R=du,KEY_F=dd,KEY_D=dl,KEY_G=dr \
    --ui-axismap lt=void,rt=void,x1=void,x2=void,y1=void,y2=void \
    &

This works perfectly for what I wanted. Definitely use the by-id approach as that guarantees the Ultimarc Game Controller is used rather than any other plug and play device.

Nope, that did not work – I suspect I had my keyboard plugged in at the time.

A real shame, because if someone could get the OS to interpret two different parts of the keyboard as a joystick, then that would be awesome.

Attempt #2: Update retroarch.cfg

Ultimately, I had to follow the page on Keyboard controllers at Retopie and setup retroarch.cfg for all systems to use the keyboard as player 1 and player 2. This works well with Retroarch and definitely, two people can play head to head with the controller AND I can use the RGB lights.

There’s a problem though. What if I wanted to play a game like Gauntlet with four people, two on the controller, and two on wireless joysticks?

It seems that for now, I’m a bit out of luck unless I use a tool like Retropie Joystick Selection and force a joystick to be used for player 3 and 4. It’s kludgy but it works. It would be nice if this were available through the Emulation Station UI so I don’t have to login to my Raspberry Pi to make the changes.

Now, for practicality sake, how many people will actually use the controller directly versus using wireless controllers? Most people will likely play games with wireless controllers as our living room is in a bit of an odd layout with the couches perpendicular to the television.

Wireless Controllers?

Of course! I want friends to be able to play games like Gauntlet – very much a favourite – which supports up to 4 players. This was a big deal when Atari came out with the game, and very much my kind of D&D-like game to throw virtual quarters at.

I’m using 8BitDo SN30s and Ultimates in my build. The Ultimates will be the primary controllers for player 1 and 2, with the SN30s for player 3 and 4, or if preferred, someone can use the SN30s.

How about that LED Lighting?

Ultimarc suggests using RGB Commander, however clicking the link, RGB Commander no longer exists. Doing a search, RGB Commander is nowhere to be found.

Welcome to the Internet Wayback Machine – You can download version 4.0.5 here, which was the last version.

Details can be found here.

Much thanks to Gijsbrecht De Waegeneer – if there is a way I can support you in the future, I’d like to through a donation, or some other means. Even if I could host or even take over the code, it’s clear there is demand for RGB Commander.

RBG Commander has two config files:

  • rgbcmdd.xml which defines the actual behaviour of the LEDs and RGB Commander
  • Animation files in the rgba folder

Some tips about RGB Commander:

  • You can setup a static pattern, you don’t always have to use an Animation
  • When creating your own RGBA file, use three values to set RGB
  • When you start programming the RGB values on the right side, I have noticed that I had to program the values not in R, G, B triplets but in B, G, R – I’m double checking to make sure I’ve not plugged in my LEDs backwards on the board
  • It’s not hard to program but will take some experimenting with the setup to understand which LED is represented by each triplet
  • I’ve not linked the application up to specific emulators and tested that, yet

I left the default animation on boot up of the Ultimate I/O card as-is – It’s almost like it’s linked to boot up of RetroPie, which it really isn’t, it isn’t like it’s a progress indicator per se, but you know RetroPie is fully loaded when my default animation starts playing. Neat!

Next up is figuring out how to get buttons to show up in the various emulators.

What else?

If you want to add external USB-based hand held controllers you can. IDs for the devices, i.e. which is the first, second, third or fourth controller seems to be determined based on the order in which they are connected to the USB hub. Play around with this on your hub. I could actually be quite wrong.

Conclusion

This has been an epic project, a bit delayed, but I got it done and I’m super pleased with the results.

This completely replaces a Raspberry Pi 400, USB hub and wireless controllers I had setup as part of my home entertainment setup and puts everything into a very accessible, expandable box. It also frees up the living room Raspberry Pi 400 for other projects.

What’s Next? I’m not planning on putting this in its own arcade cabinet as I already have an AtGames Legends Ultimate with AwesomeSaUCE and CoinOpsX. I am thinking of getting a wide IKEA Lack TV Bench or Coffee Table to put the console on as it’s a bit difficult to sit on the floor comfortably although it does give me significant modern 80s retro vibes and memories.